How to connect your CVCRM to Play2sell PAY and pay commissions automatically — credentials, webhooks, payment method, receipt, lifecycle, testing, FAQ, and troubleshooting. Screen-by-screen setup, no coding.
The CVCRM × Commission Payments integration connects your CVCRM to Play2sell PAY to issue the sale’s boleto to the buyer and pay commissions automatically — with the boleto, settlement, deed registration, and receipt reflected back in your CVCRM. Setup is done screen by screen, with no coding, and takes about 15 minutes.
Generate an API token, create 3 webhooks, and make sure the commission uses the Boleto payment method.
2
In the Play2sell panel
Connect the CVCRM (credentials + situation mapping) and copy the webhook URL.
Step
What you do
Result
1
Generate a token in CVCRM
the connection’s API credential
2
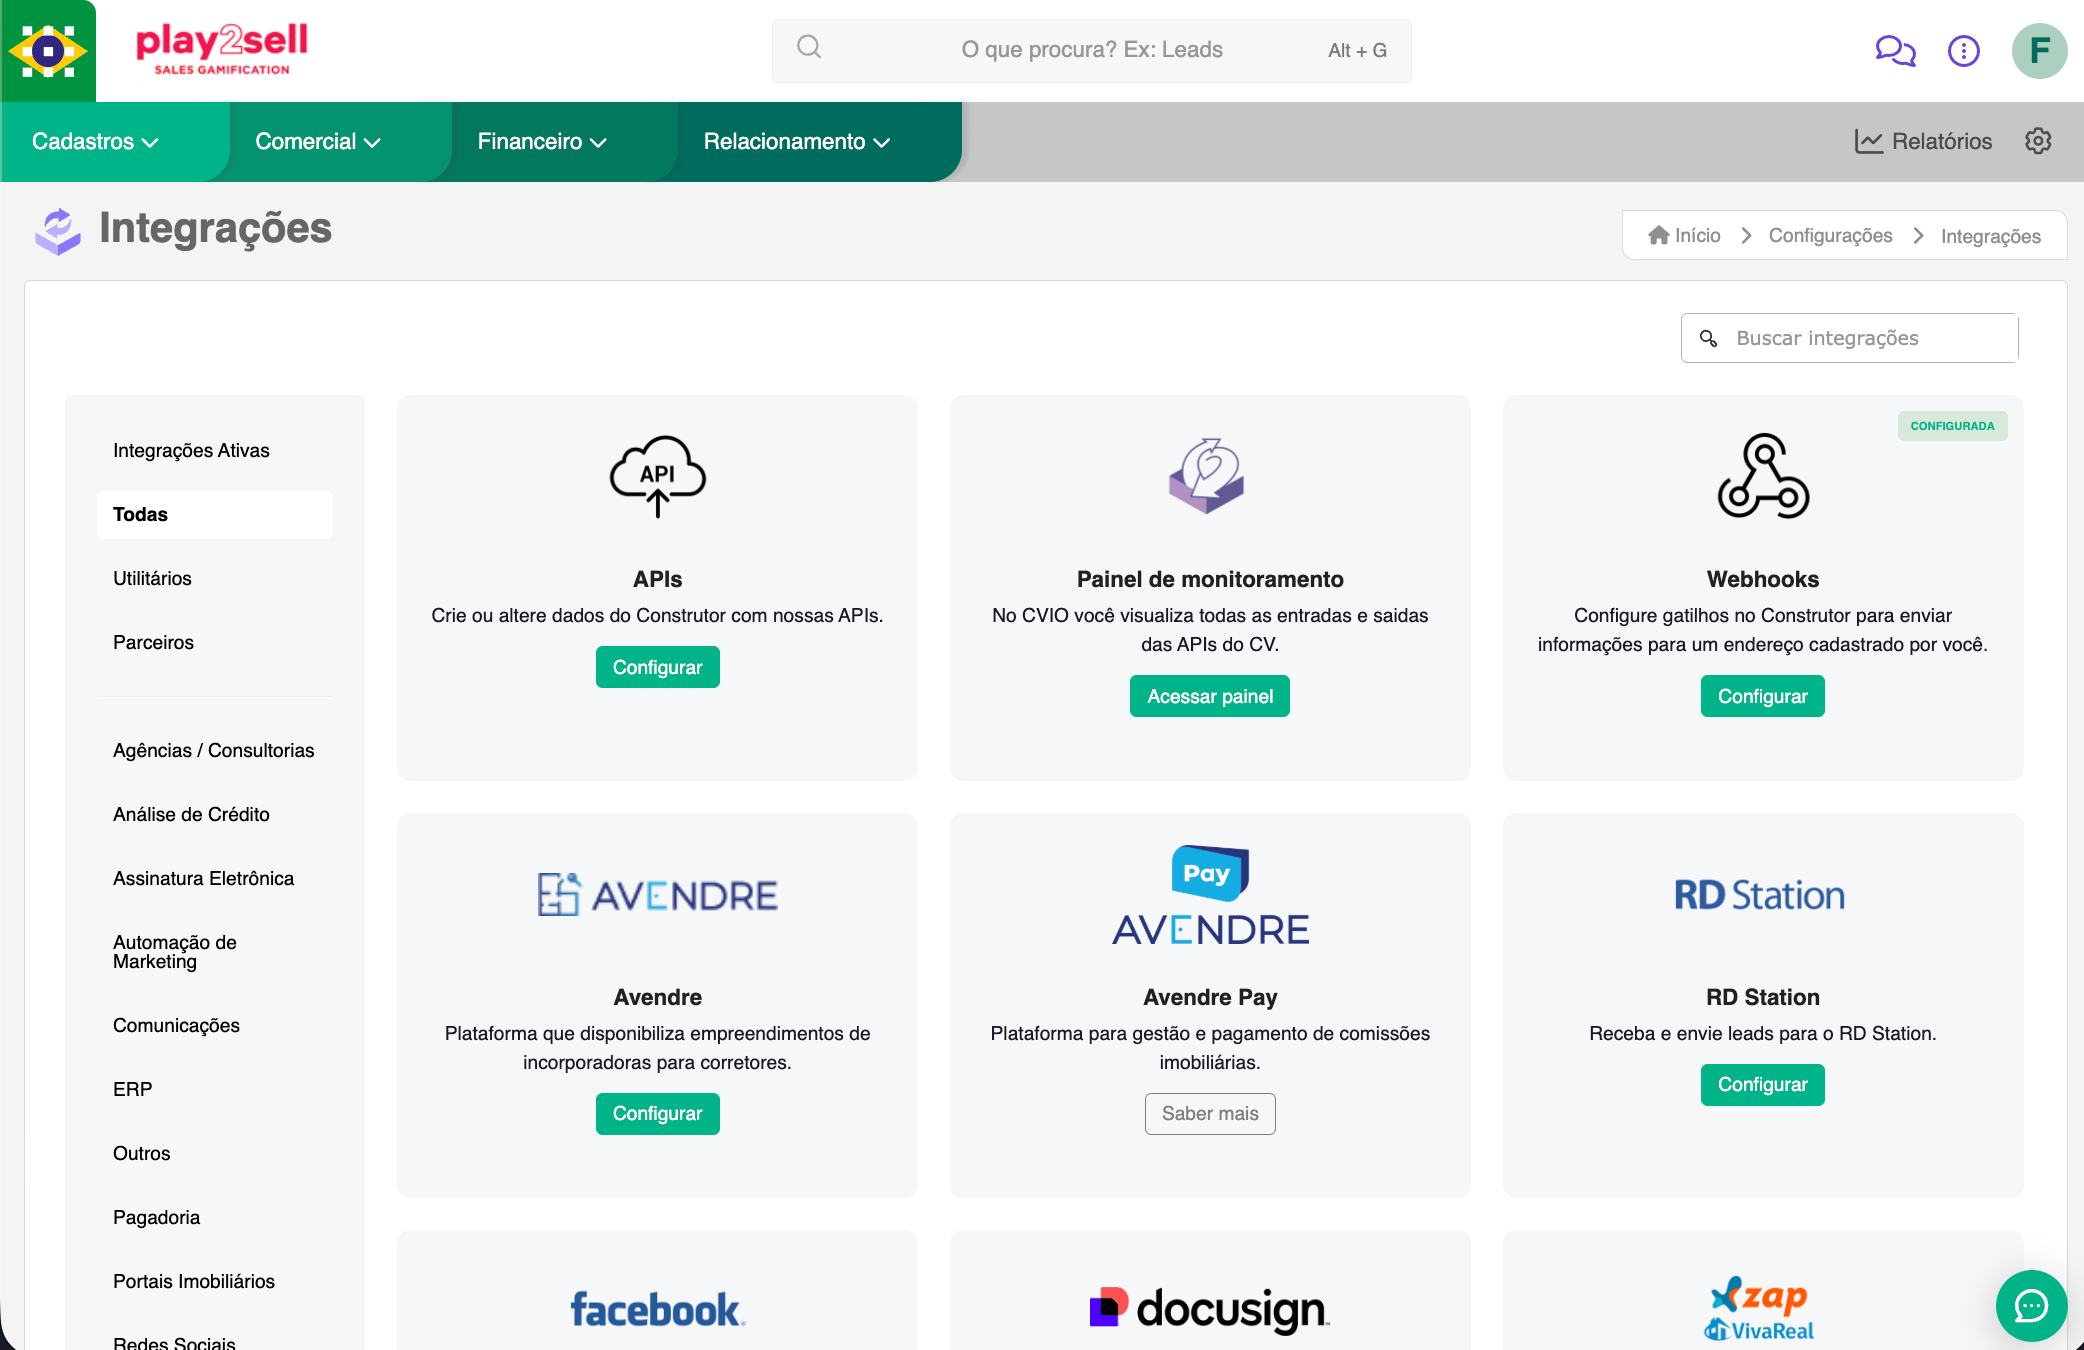
Connect the CVCRM in the Play2sell panel
integration configured
3
Copy your webhook URL
the address CVCRM uses to notify Play2sell
4
Create 3 webhooks in CVCRM
CVCRM starts notifying each event
5
Test with a sale
confirms the end-to-end flow
Prerequisites
Administrative access to your CVCRM manager (yourcompany.cvcrm.com.br/gestor).
A dedicated API user (CVCRM recommends naming it “Integração”, so the history stays attributable). If you’ll use the transfer receipt (Step 2.4), this user must be a manager with a panel access password.
The situations (statuses) you use for sale, deed registration, and cancellation/contract termination already configured in CVCRM.
Play2sell PAY enabled on your account (if unsure, contact support).
The CVCRM is the source of truth for the sale, the parties, the commission split, and the deed registration. Play2sell PAY issues the boleto to the buyer, holds the funds in custody, and distributes the commissions. The two systems stay in sync via webhooks (CVCRM signals when something changes) and write-backs (Play2sell reports the result back in CVCRM).
1
CVCRM creates the contract
When the sale is registered, CVCRM has the amount, the beneficiaries, the number of installments, and the due dates.
2
Play2sell issues the boleto
Play2sell originates the sale and issues a boleto (with Pix) to the buyer.
3
The boleto goes back to CVCRM
The issued boleto is written back to the reservation’s commission (situation “Programado”).
4
Buyer pays → CVCRM receives settlement
Upon payment confirmation, Play2sell reports the paid status back to CVCRM.
5
CVCRM registers the deed → the transfer is released
When the commission’s deed is registered, Play2sell releases and distributes the transfer to the beneficiaries.
6
Play2sell pays and attaches the receipt
Transfer via PIX to each beneficiary; the receipt is attached to the commission in CVCRM. On contract termination, the amount is refunded.
Safe synchronization. CVCRM webhooks are thin — they carry only an identifier (e.g., {"idreserva": 123}). Play2sell uses that signal merely as a trigger and fetches the full record back from the CVCRM API, authenticated, before acting. That’s why a forged webhook can’t inject data.
Identity is by CPF/CNPJ, never by email. Buyers and beneficiaries are resolved by document. Make sure brokers, the real estate agency, and other beneficiaries have their CPF/CNPJ filled in within CVCRM.
Step 1 — Get the credentials in CVCRM (email + token)
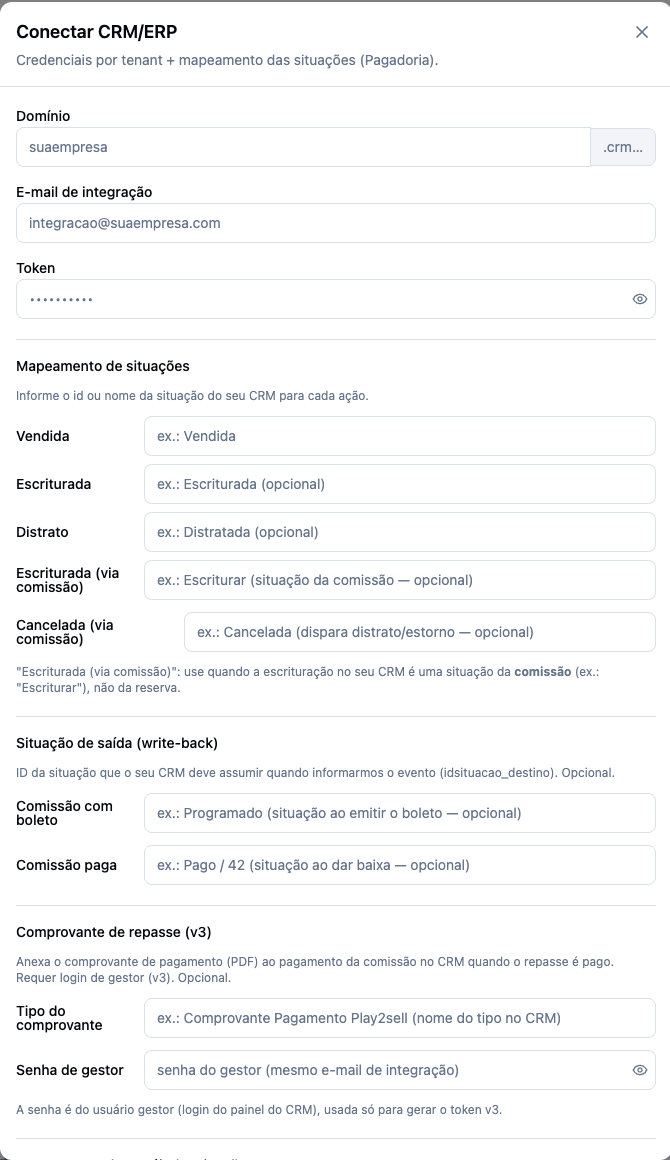
The connection needs three values from your CVCRM: domain, email, and token.
1
Open Usuários Administrativos
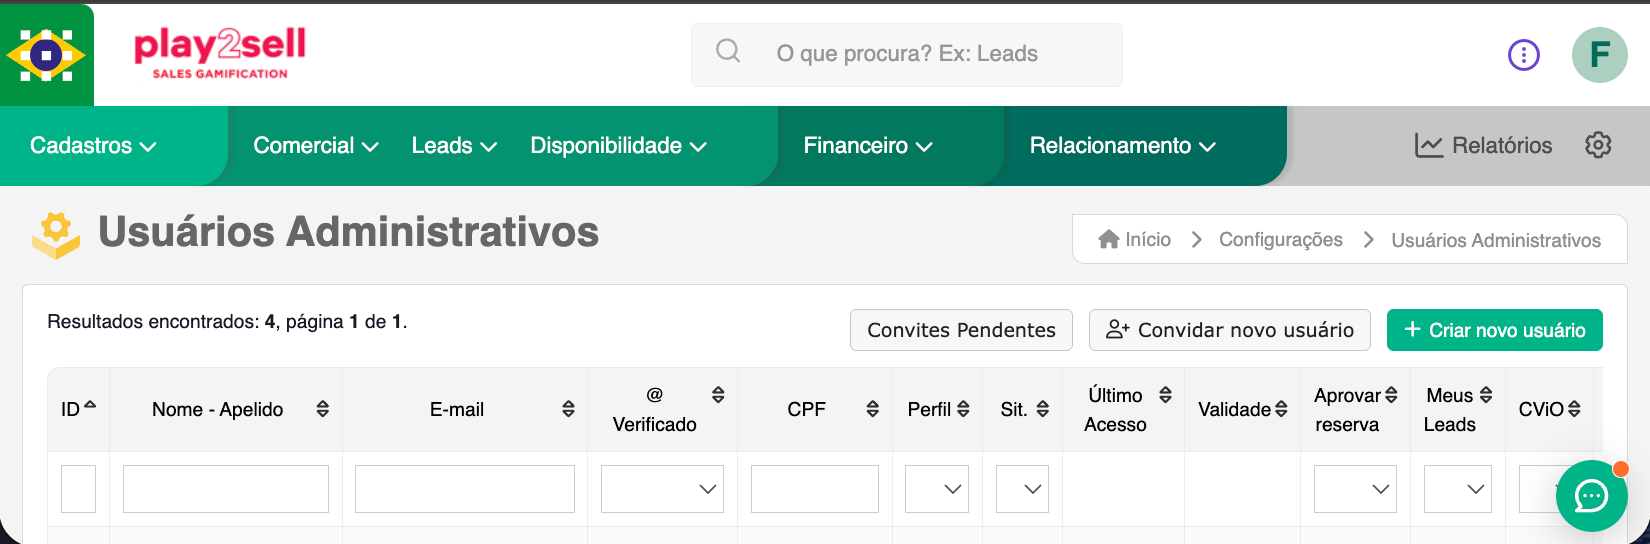
In the CVCRM manager, click the gear ⚙ (top-right corner) and go to Usuários Administrativos (Administrative Users).
2
Open the integration user's options
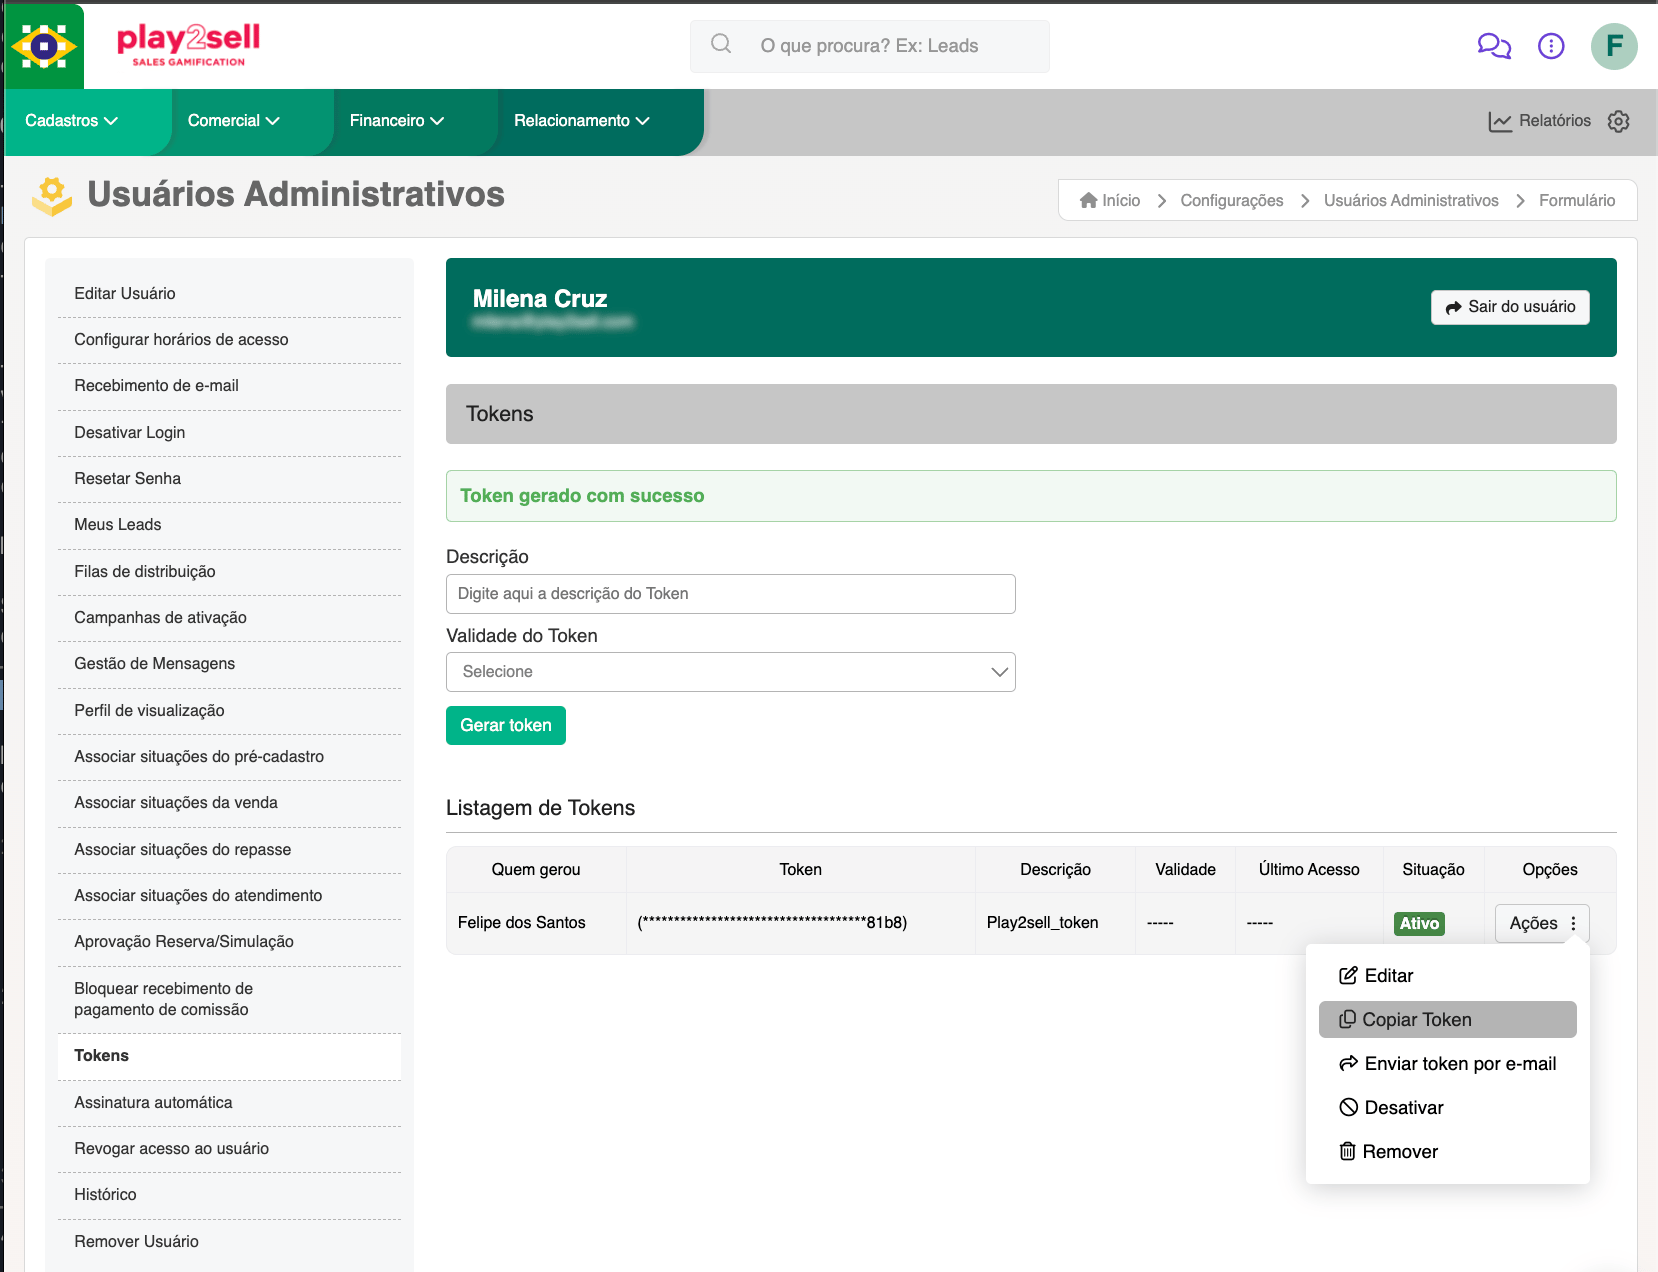
Find the integration user in the list and, under Opções (Options), choose Tokens.
CVCRM manager → Usuários Administrativos → user list
3
Generate and copy the token
Fill in the Descrição (Description, e.g., Play2sell), choose the Validade do Token (token expiry), and click Gerar token (Generate token). The token appears in the Listagem de Tokens (token list) — under Ações → Copiar Token (Actions → Copy Token), copy it.
Here you tell Play2sell which situation in your CVCRM corresponds to each action. Enter the name (or the id) of the situation, exactly as it appears in your CVCRM.
Field
When to use
Action it triggers
Vendida
The reservation situation that indicates a confirmed sale.
Originates the sale and issues the boleto.
Escriturada
(Optional) The reservation situation when deed registration is recorded on the reservation itself.
Releases the transfer.
Distrato
(Optional) The reservation situation for cancellation/contract termination.
Refund.
Escriturada (via comissão)
Use when deed registration in your CVCRM is a commission situation (e.g., “Escriturar”), not a reservation one.
Releases the transfer.
Cancelada (via comissão)
(Optional) The commission situation that triggers termination/refund.
Refund.
Use the exact label from your instance. Situations are configurable and vary from company to company — “Vendida”, “Venda Realizada”, “Aprovada”, etc. Copy the text as it appears in your CVCRM.
Many operations record deed registration on the commission (situation “Escriturar”), not on the reservation. In that case, leave Escriturada blank and fill in Escriturada (via comissão).
The write-back is when Play2sell reports the result back in CVCRM. These fields say which situation your CVCRM should take on for each event. They are optional.
Field
Meaning
Example
Comissão com boleto
The commission payment situation when the boleto is issued.
Programado
Comissão paga
The commission payment situation when it is settled (paid).
Pago
For the exit situation, always prefer the name (e.g., Programado, Pago) over the id. The payment situation ids vary per instance and may land on misleading values.
Makes Play2sell attach the payment receipt (PDF) to the commission in CVCRM when the transfer is paid. It is optional and requires a manager login in CVCRM.
Field
What to enter
Tipo do comprovante
The file type name registered in your CVCRM (e.g., Comprovante_Play2sell).
Senha de gestor
The password of the CVCRM manager user (the same E-mail de integração).
Credentials the receipt requires. The attachment uses CVCRM’s v3 API, which — unlike the rest of the integration (which uses the token) — logs in with email + password to the manager panel. Therefore:
The E-mail de integração (Step 2.1) must belong to a manager user that signs in to the CVCRM panel with a password.
Enter that user’s password in the Senha de gestor field.
Access is renewed automatically — you don’t update anything periodically. If you change the password in CVCRM, update it here too.
The receipt type must already exist in your CVCRM, and the name here must be identical to the one registered there. See how to create it in Step 4.2. Without this setup, everything else still works — only the receipt attachment doesn’t happen.
Translate your CVCRM’s commission type into the beneficiary’s role in Play2sell. On the left, the text as it comes from CVCRM (e.g., Corretor); on the right, the role: VENDEDOR, IMOBILIARIA, HOUSE, GERENTE, COORDENADOR, or PARCEIRO. Use ”+ Adicionar papel” (+ Add role) to include as many as you need.Click Conectar to save.
CVCRM shows as connected in the panel and opens the “CRM conectado” (CRM connected) screen with your webhook URL.
When you click Conectar, Play2sell automatically provisions the receiving endpoint and shows the “CRM conectado” screen with your webhook URL and a copy button. Copy that URL — you’ll paste it into CVCRM in the next step.
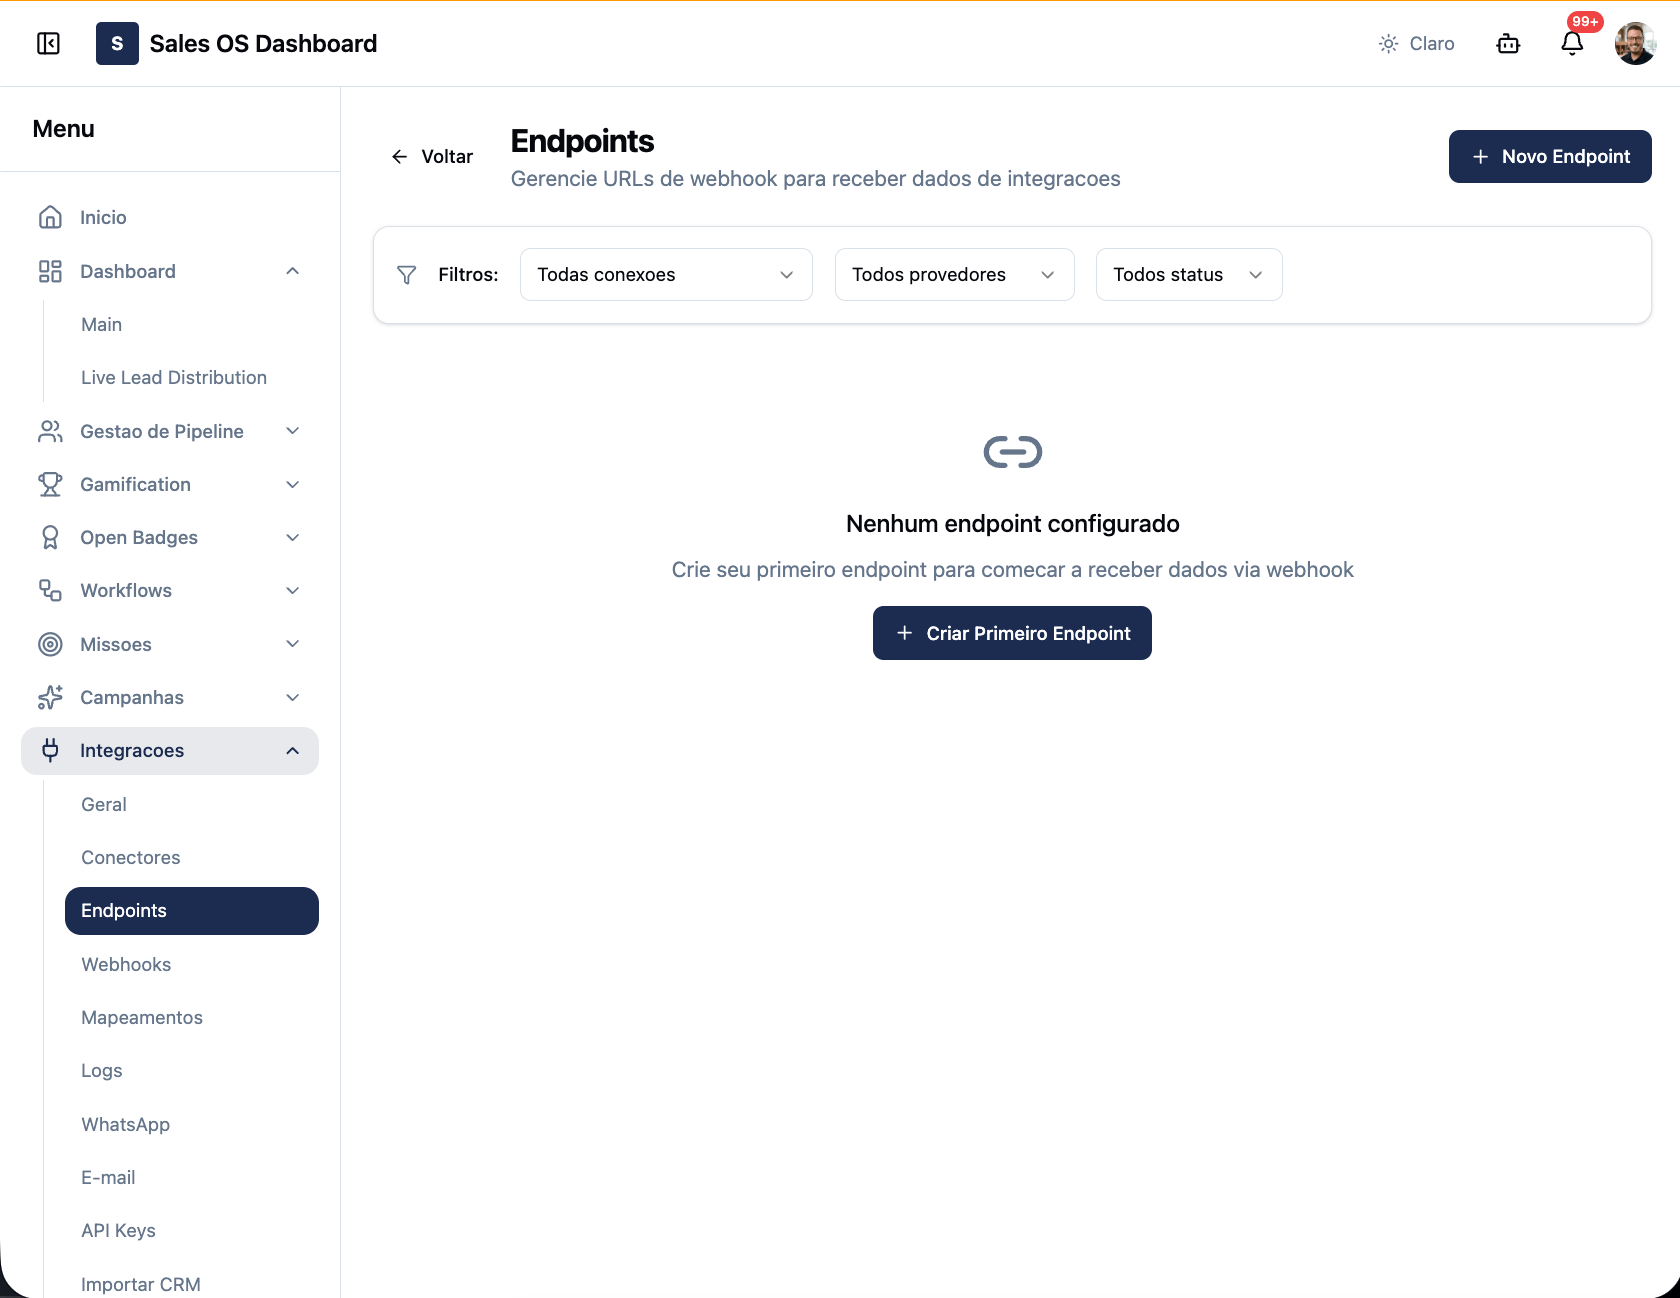
The URL is unique to your account. To retrieve it later, go to Integrações → Endpoints — that’s where the webhook endpoints are listed.
Integrações → Endpoints — where the URL is available later
You have the webhook URL copied — ready to paste into CVCRM.
You’ll create 3 webhooks — all pointing to the same URL (the one from Step 3). What changes in each is the Funcionalidade (Feature) and the trigger situation:
#
Funcionalidade
Trigger situation (example)
Field in the panel (Step 2.2)
What it triggers
1
Reserva
sale / send to commission payments
Vendida
origination + boleto issuance
2
Comissão
escriturar
Escriturada (via comissão)
releases the transfer (PIX)
3
Comissão
cancellation
Cancelada (via comissão)
cancels the unpaid boleto / refunds the paid one
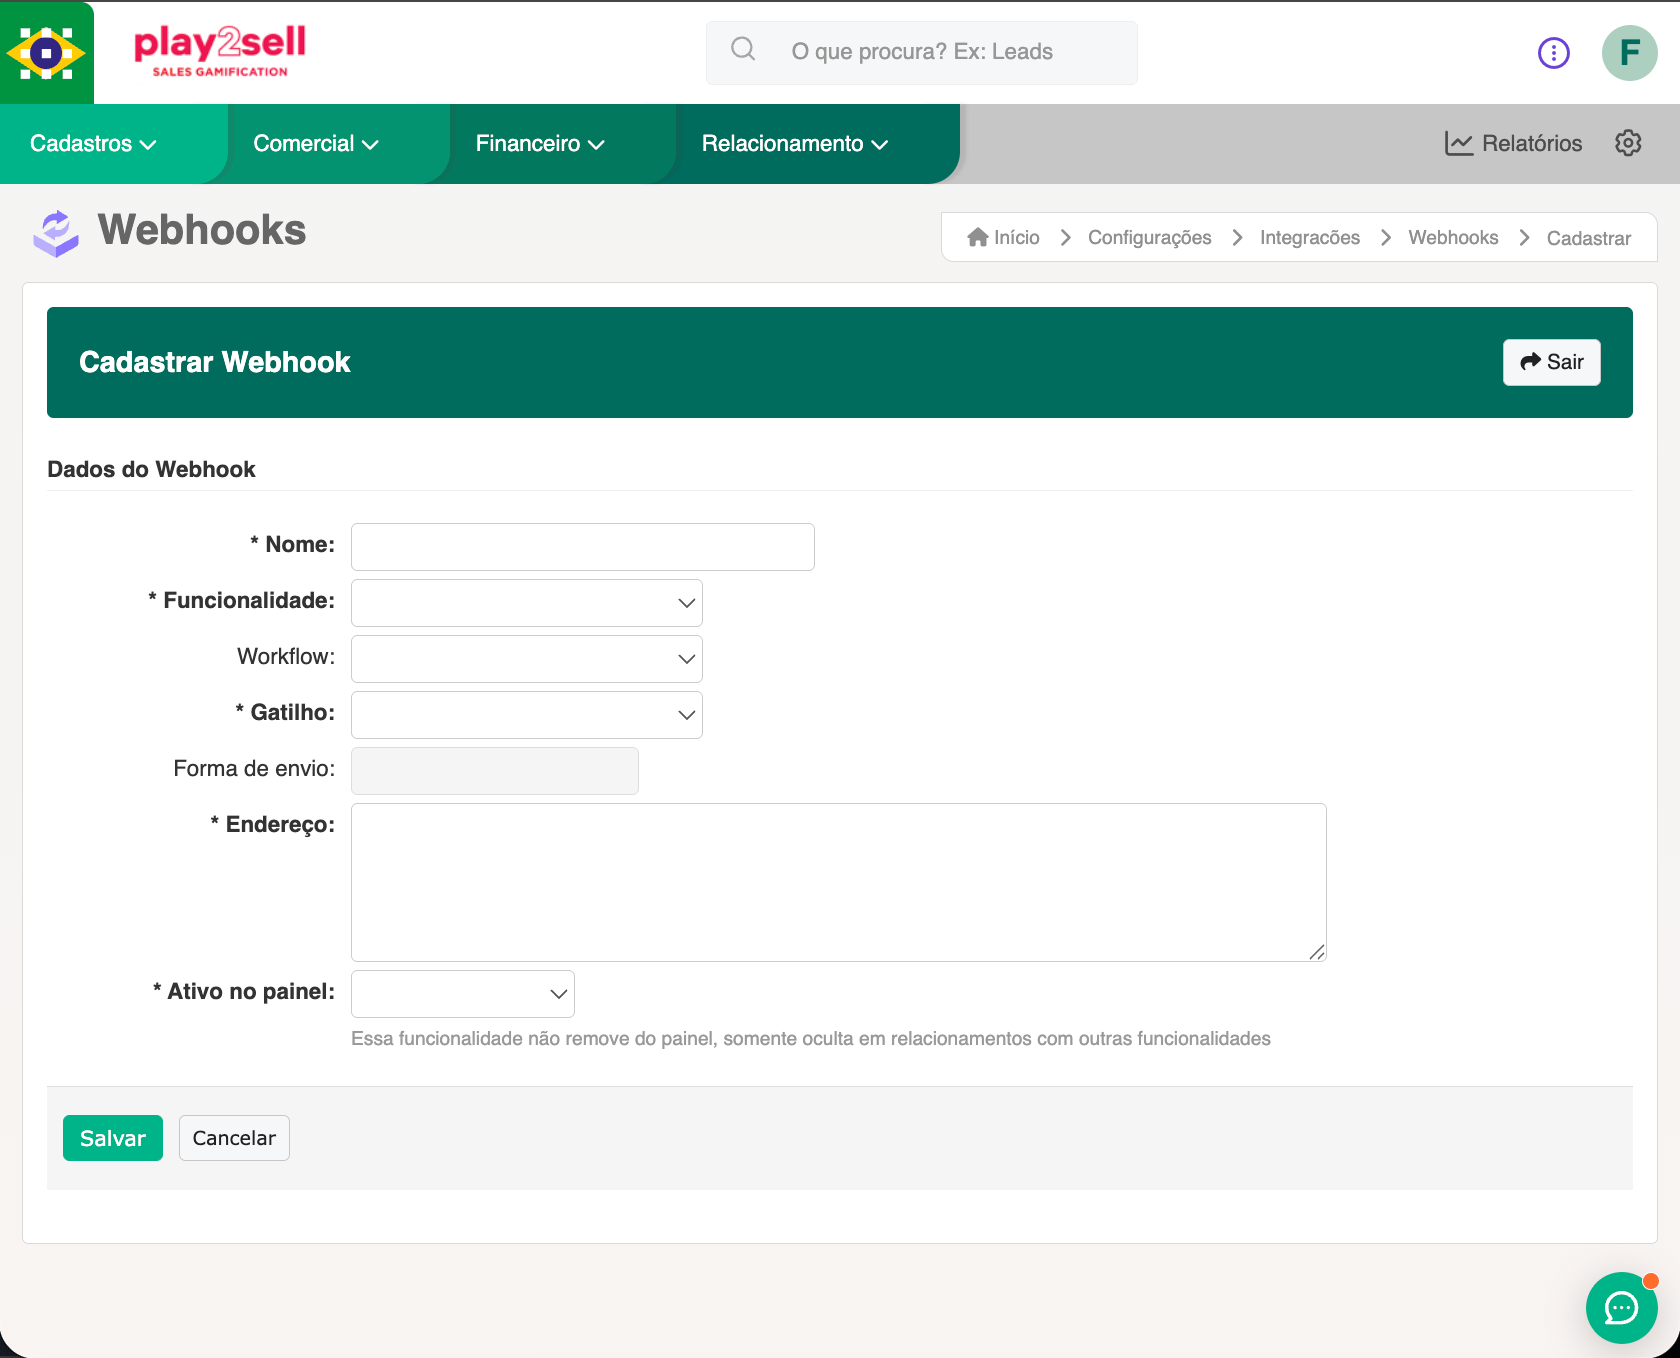
For each one, click ”+ Criar novo Webhook” (+ Create new Webhook) and fill in the form:
CVCRM field
What to enter
Nome
A clear label of your choosing (e.g., Pagadoria — venda).
Funcionalidade
Reserva (webhook 1) or Comissão (webhooks 2 and 3).
Workflow
Appears when the Funcionalidade has more than one situation flow. Under Comissão there is more than one workflow — choose the one that contains the trigger situation (“Escriturar” / “Cancelada”); if unsure, open the selector and see which workflow the situation appears in. Under Reserva there is usually only one.
Gatilho
The situation that triggers the send. Use the exact label from your instance (the same as in Step 2.2).
Forma de envio
Leave the default.
Endereço
Paste the webhook URL copied in Step 3.
Ativo no painel
Leave it active — without this, the webhook won’t fire.
Registering a new webhook in CVCRM
1
Webhook 1 — Origination (required)
Funcionalidade Reserva, on the situation that marks the sale / the send to commission payments (the same as the Vendida field, Step 2.2). Makes Play2sell originate the sale and issue the boleto.
2
Webhook 2 — Deed registration → releases the transfer (required)
Funcionalidade Comissão, on the situation that indicates deed registration/release — e.g., “Escriturar” (the same as the Escriturada (via comissão) field, Step 2.2). Releases the transfer and pays the beneficiaries via PIX.
Funcionalidade Comissão, on the cancellation situation — e.g., “Cancelada” (the same as the Cancelada (via comissão) field, Step 2.2). Cancels the unpaid boleto or refunds the paid one, depending on the state.
Link the webhooks to the integration user (“Integração”) — that way the changes made by the automation stay attributable in the CVCRM history.
Variation by instance. If your CVCRM records deed registration or cancellation on the reservation itself (and not on the commission), create webhooks 2 and 3 with Funcionalidade Reserva and, in Step 2.2, use the Escriturada and Distrato fields instead of the “(via comissão)” ones. The behavior is the same.
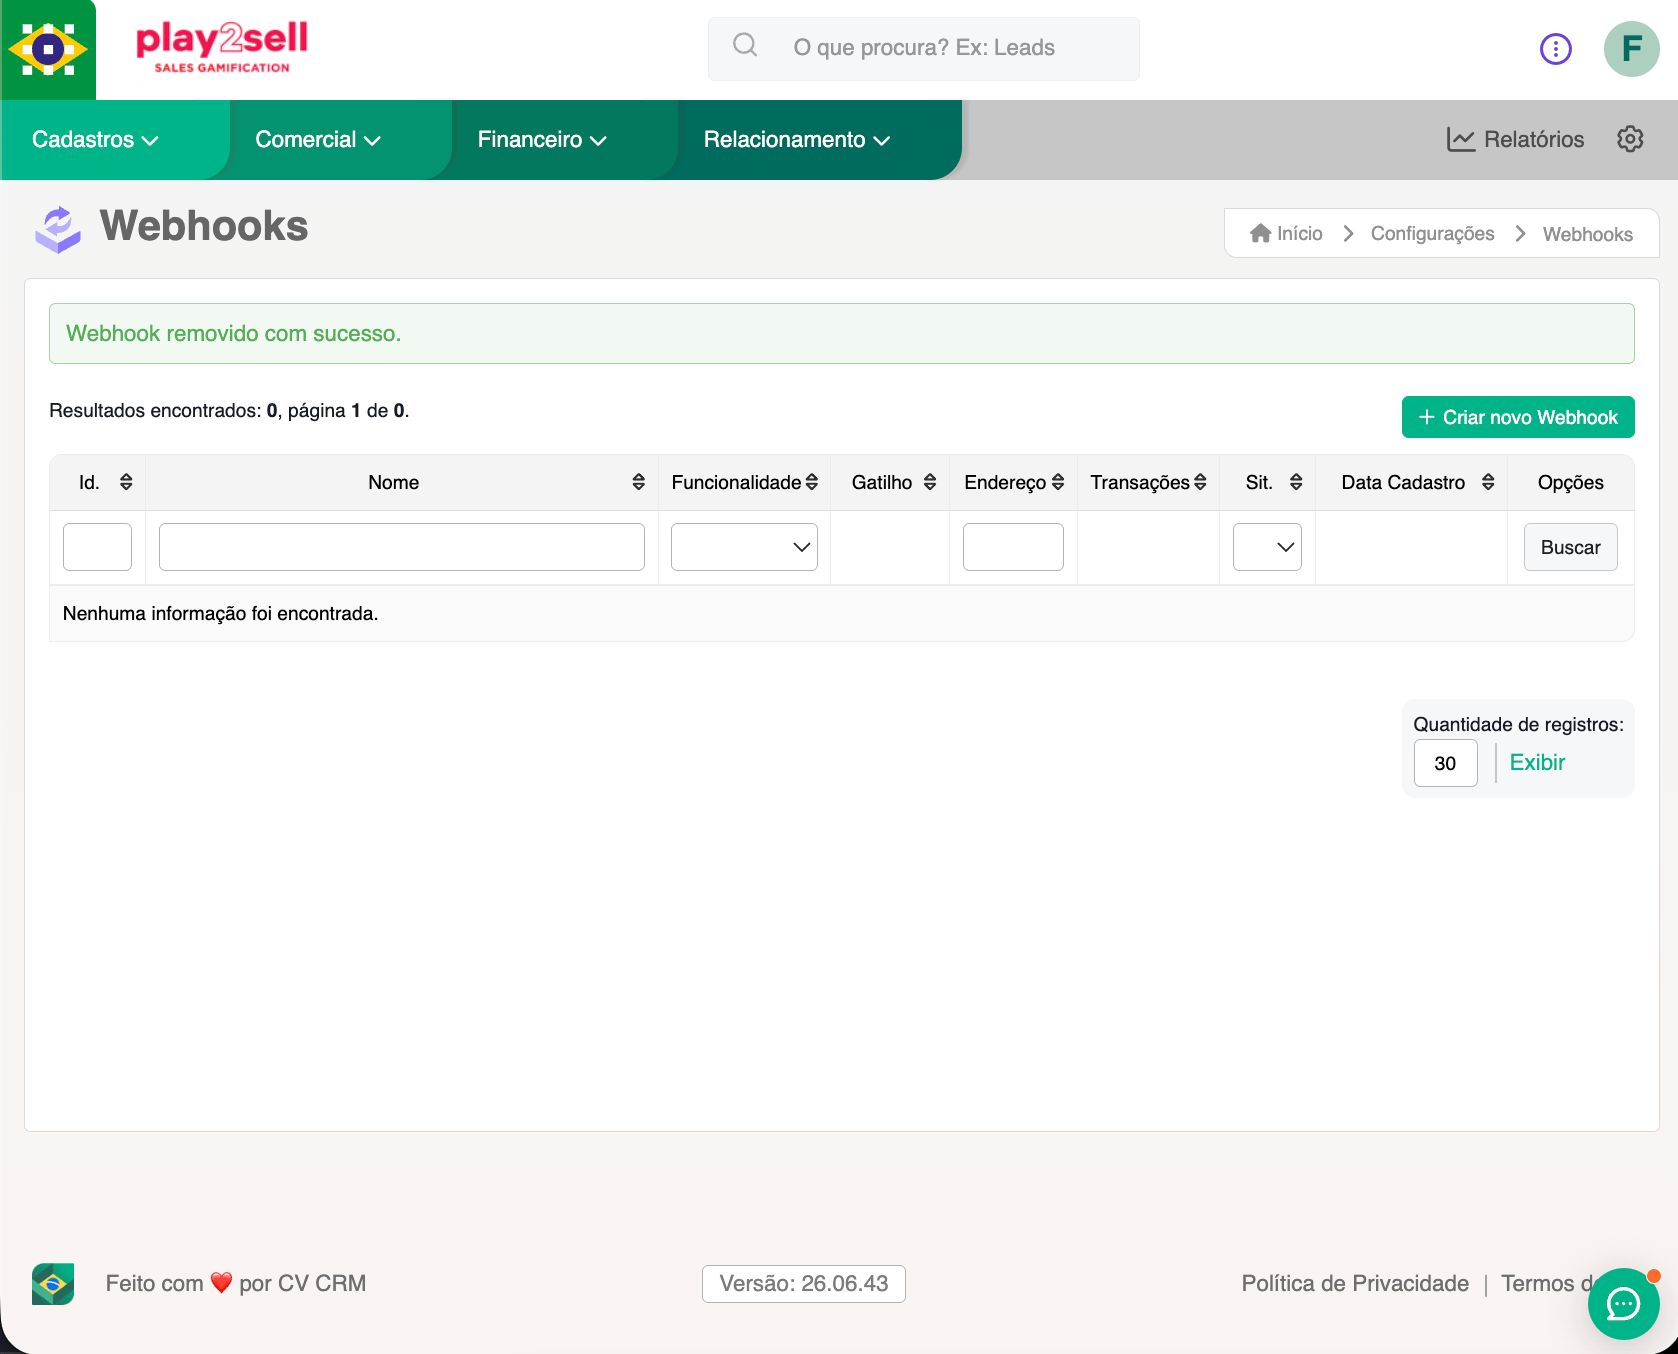
Confirm the 3 webhooks are firing. In the webhook list, the Transações (Transactions) column counts each send. If it stays at 0 after moving a record to the trigger situation, review: the Funcionalidade, the situation (it must match Step 2.2), whether the webhook is Ativo no painel, and whether the Endereço is the exact URL from Step 3 (no spaces).
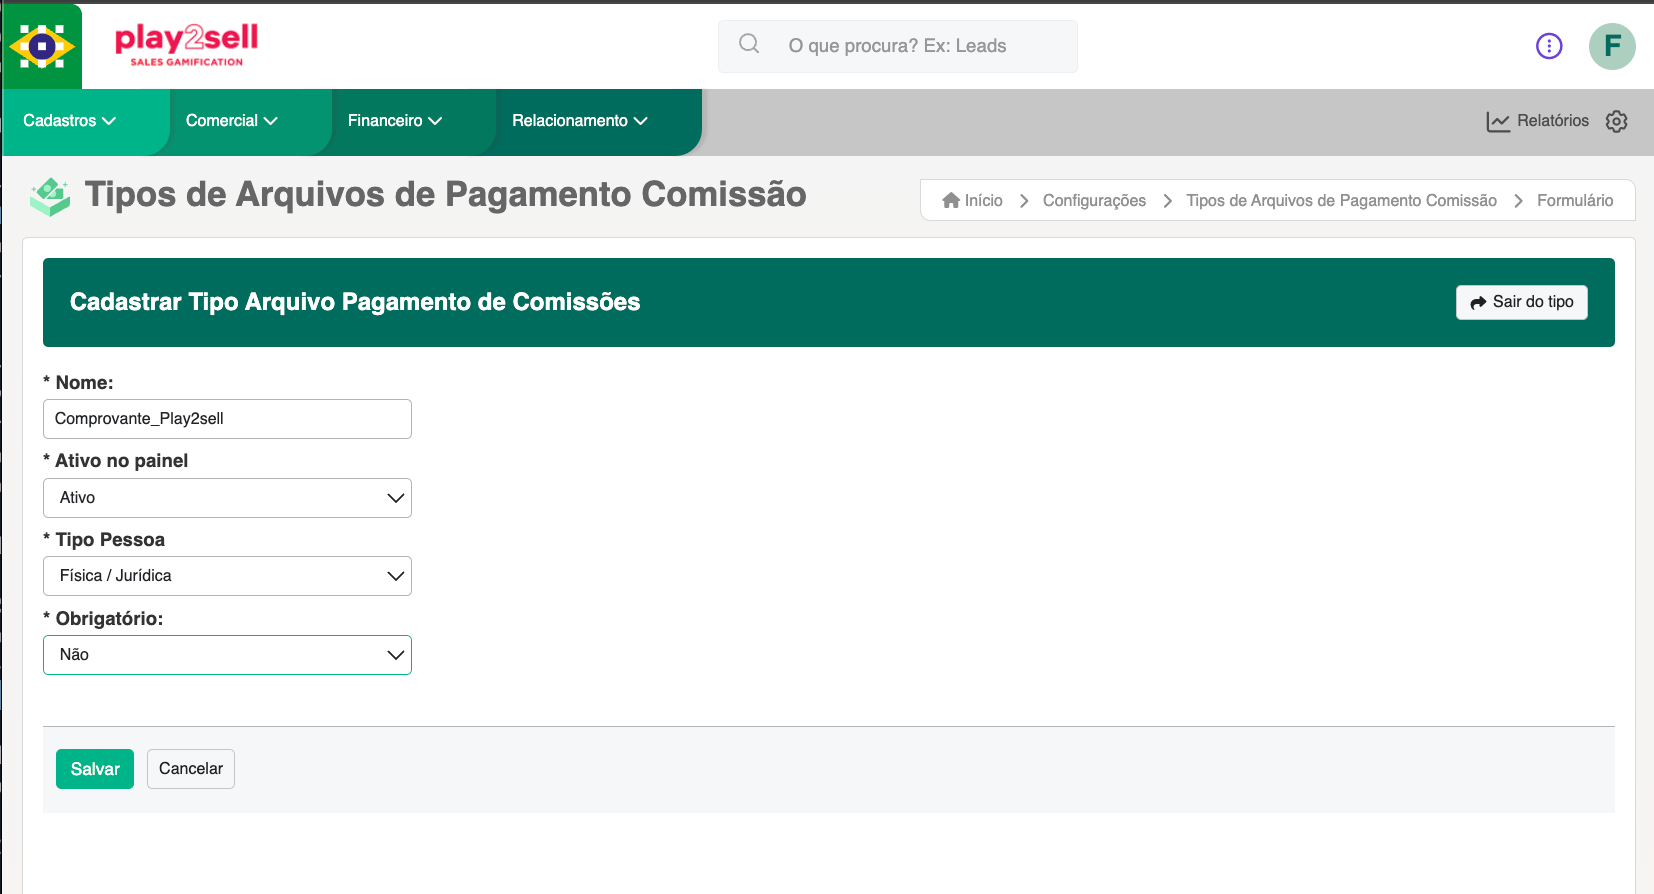
Do this only if you enabled the Transfer receipt in Step 2.4. It’s a one-time setting that creates the file type used to attach the receipt PDF to the commission.In the CVCRM manager, go to Configurações → Tipos de Arquivos de Pagamento Comissão (Settings → Commission Payment File Types), click ”+ Criar novo Tipo” (+ Create new Type), and fill in:
Field
What to enter
Nome
The type name (e.g., Comprovante_Play2sell). Use exactly this name in the “Tipo do comprovante” field from Step 2.4.
Ativo no painel
Ativo (Active).
Tipo Pessoa
Física / Jurídica (Individual / Company).
Obrigatório
Não (No) — Play2sell attaches the receipt automatically.
CVCRM → Tipos de Arquivos de Pagamento Comissão → Criar novo Tipo
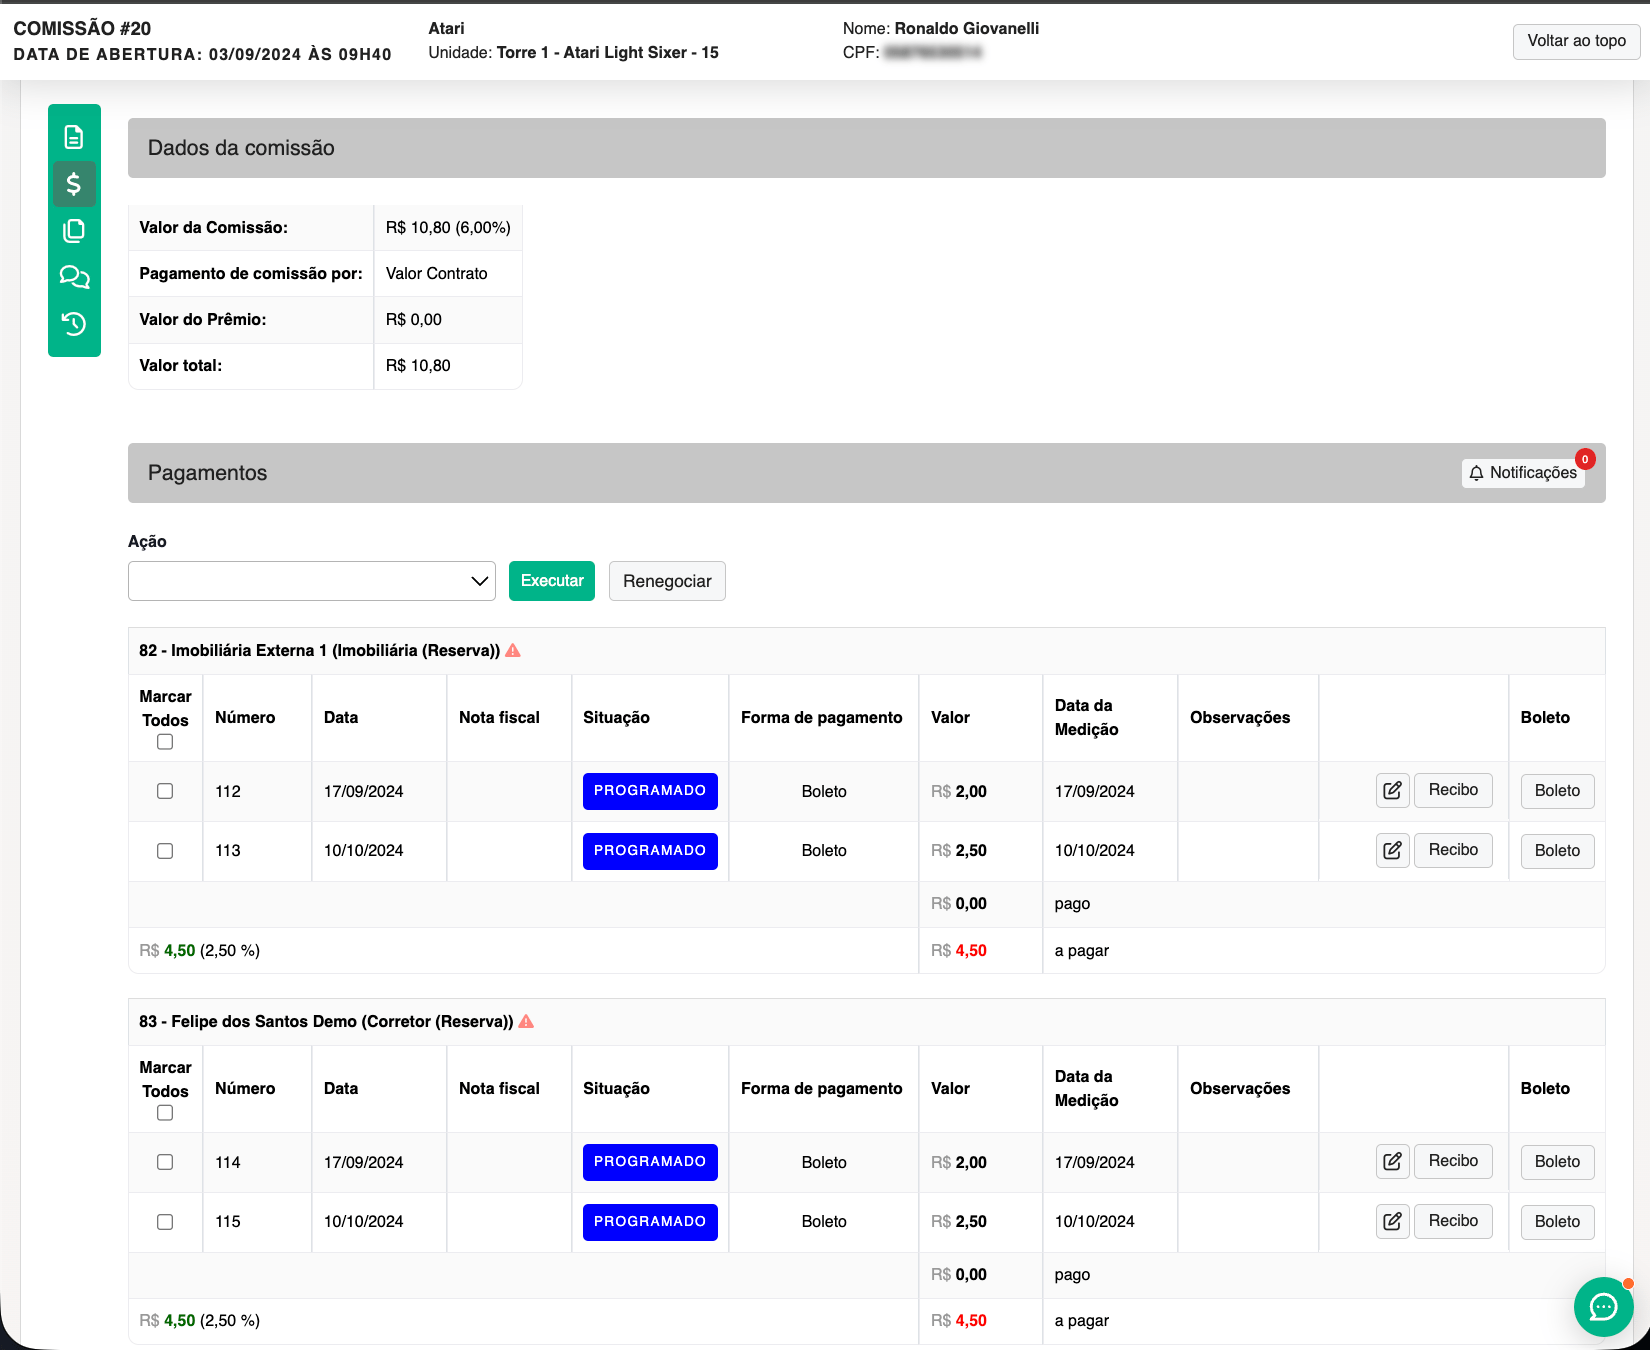
For the boleto issued by Play2sell to appear as the commission receivable (and settle correctly), the commission payments in CVCRM must use the “Boleto” payment method.To check: in Financeiro → Comissões (Finance → Commissions), open a commission and click the $ icon (Payments). In the Pagamentos (Payments) section, each beneficiary installment has a “Forma de pagamento” (Payment method) column — it must be set to Boleto.
If the installment has another method (e.g., “Transferência bancária”/bank transfer), the boleto we issue won’t match the commission. Adjust the method to Boleto in your CVCRM’s commission rule/condition.
Commission → Payments: each installment with Forma de pagamento = Boleto (situation “Programado” after issuance)
4.4 — Choose who goes into the boleto (“Enviar para Pagadoria”)
In the CVCRM commission rule, each commission recipient has the field Enviar para Pagadoria (Sim or Não). It decides who Play2sell charges for and pays.To check: in Financeiro → Configuração de Comissões → Regras da comissão, open the recipient’s line with Editar and look at the Enviar para Pagadoria field.
How the rule is set
What Play2sell does
At least one recipient set to Sim
Originates the sale. The boleto for each due date is the sum of the commissions set to Sim.
Recipient set to Não
Stays out of the boleto and is not paid by Play2sell at deed registration. You pay this recipient outside Play2sell.
All set to Não
No boleto is issued. The reservation shows as Nada a cobrar (nothing to charge) in the panel — it is not an error.
Example. Total commission of R10,000withthreerecipients:thefirstgetsR 5,000 (Sim), the second R2,000(∗∗Na~o∗∗)andthethirdR 3,000 (Sim). The buyer’s boleto is issued for R$ 8,000, and at deed registration only the first and the third are paid.
At most 6 recipients set to “Sim” per due date. The rule may have more recipients than that, as long as no more than 6 are set to Sim on each due date.
Changed the option after the reservation went through? Editing “Enviar para Pagadoria” in CVCRM does not notify Play2sell. After adjusting it, use Gerar boleto in the panel — see How to reprocess a reservation under Troubleshooting.
When the same recipient appears on more than one line of the rule (for example, commission and bonus), keep all of their lines on the same option. With one line on Sim and another on Não, Play2sell cannot tell which installment to charge and does not issue the boleto.
No. The entire setup is done through screens, in the CVCRM manager and the Play2sell panel. You only need administrative access to both systems. No code is required.
Which webhooks does CVCRM need to have?
Three, all pointing to the same URL: (1) Reserva on the sale situation → origination; (2) Comissão on the “Escriturar” situation → releases the transfer; (3) Comissão on the cancellation situation → refund.
How is the commission amount calculated?
CVCRM shows the gross commission. Play2sell applies the service fee (typically 1–3%) and the beneficiary receives the net amount via PIX. The calculation uses the commission amount, not the sale amount.
Does the integration work with a commission smaller than 100% of the sale?
Yes. The boleto and the split are calculated on the commission amount, so any percentage works.
How quickly does the broker get paid?
After the commission’s deed is registered in CVCRM, the PIX transfer is processed within seconds and lands in the beneficiary’s account.
Is the transfer receipt mandatory?
No, it’s optional. Without it, the transfer is paid normally; only the PDF attachment on the CVCRM commission doesn’t happen.
Check in CVCRM: is the webhook Ativo (active)? Do the Funcionalidade (Reserva/Comissão) and the trigger situation match what you mapped in the panel? Is the Endereço the exact URL copied in Step 3 (no spaces/line breaks)?
The boleto didn't appear on the commission
Confirm that the commission’s payment method is Boleto (Step 4.3) and that the exit situation “Comissão com boleto” is filled in (e.g., Programado). After adjusting the configuration, use Gerar boleto in the panel (see How to reprocess a reservation, below).
The reservation shows "Nada a cobrar"
Every recipient in the rule was set to Enviar para Pagadoria = Não when the reservation arrived, so there was nothing to charge. If it should have been charged, set the right recipients to Sim (Step 4.4) and use Gerar boleto in the panel.
How to reprocess a reservation
In the Play2sell panel, go to Integrações → Geral, find the Integração CRM/ERP card and open Eventos recentes. Reservation rows with status Falha or Nada a cobrar show the action Gerar boleto.When you confirm, Play2sell reads the reservation in CVCRM as it is now and issues the boleto with the commissions set to Sim — even if the reservation has already left the situation that generates the boleto. If the reservation is in a cancellation situation, the cancellation prevails. The action is shown to users allowed to manage payments.
A beneficiary wasn't found / the transfer didn't go out
Identity is by CPF/CNPJ, never by email. Make sure the beneficiary’s document is filled in and correct in CVCRM.
The paid status didn't reflect immediately
Payment confirmations and write-backs can take a few moments. If it persists, contact support.
This section is for technical teams. The setup above requires nothing from here.
CVCRM API families
Family
Use
Note
v1 (/api/v1/<module>/*)
Current — used by the integration
Auth via email + token headers; 200 req/min
CVIO (/api/cvio/*)
Legacy
Being deprecated — CVCRM is standardizing on v1
CVDW (/api/v1/cvdw/*)
BI / data warehouse
Separately paid contract; 20 req/min; returns 403 if not contracted
Synchronization and idempotency
Thin webhook → pull-back: the webhook carries only an id; Play2sell fetches the full record via an authenticated GET before acting.
Idempotency: each contract maps to a stable key derived from the reservation id (cvcrm:{idreserva}); redelivery never duplicates the sale.
Ordering: if deed registration arrives before origination completes, it is deferred and reprocessed.
Gotchas
CVCRM may return HTTP 200 with codigo:404 in the body for non-existent routes — always check the codigo field, not just the HTTP status.
Date filters on some endpoints are ignored — window on the client side.
Dates in the installments GET use DD/MM/YYYY.
There are two distinct situation workflows — the commission one and the commission payment one — with ids that can collide. That’s why the situation write-back uses the name (“Programado”/“Pago”), not the id.
Need help mapping the situations in your instance? Contact support at suporte@play2sell.com with your domain and the list of situations you use for sale / deed registration / contract termination.
{"docsConfig":{"theme":"mint","$schema":"https://mintlify.com/docs.json","name":"SalesOS","colors":{"primary":"#e20c18","light":"#e30647","dark":"#c50a14"},"logo":{"light":"https://mintcdn.com/play2sell/FiU6GxxU6y37uxdh/logo/light.png?fit=max\u0026auto=format\u0026n=FiU6GxxU6y37uxdh\u0026q=85\u0026s=2be3dc625b663625442ce45235218008","dark":"https://mintcdn.com/play2sell/FiU6GxxU6y37uxdh/logo/dark.png?fit=max\u0026auto=format\u0026n=FiU6GxxU6y37uxdh\u0026q=85\u0026s=1a601e82f18c0ba66d009e8f82284d14"},"favicon":"https://mintcdn.com/play2sell/kLdQdLmEQ4l-mHv0/favicon.png?fit=max\u0026auto=format\u0026n=kLdQdLmEQ4l-mHv0\u0026q=85\u0026s=ab0e9a29df9c103178a1307f9f033fec","navbar":{"links":[{"href":"mailto:suporte@play2sell.com","label":"Support"}],"primary":{"type":"button","label":"Open SalesOS","href":"https://app.play2sell.com"}},"footer":{"socials":{"linkedin":"https://linkedin.com/company/play2sell","website":"https://play2sell.com"}},"contextual":{"options":["copy","view","chatgpt","claude","perplexity","mcp","cursor","vscode"],"display":"header"},"styling":{"latex":true},"navigation":{"global":{"anchors":[{"anchor":"Website","icon":"globe","href":"https://play2sell.com"}]},"languages":[{"language":"en","href":""},{"language":"pt","href":"pt"},{"language":"es","href":"es"}]}},"deployment":{"deploymentMetadataValue":{"subdomain":"play2sell","hasAudioNarration":false,"actualSubdomain":"play2sell","customDomains":["docs.play2sell.com"],"gitSource":{"type":"github","owner":"play2sellsa","repo":"docs","deployBranch":"main","contentDirectory":"","isPrivate":true,"mountPath":"","label":""},"chroma":{"liveDeploymentHistoryId":"6acfeb853f6921de90e0ea8d","collectionId":"86aad7e7-e9c8-42e2-89df-c78905bd927c","schemaVersion":"v3","latestBuiltDeploymentHistoryId":"6acfeb853f6921de90e0ea8d"},"entitlements":{},"buildId":"6acfeb853f6921de90e0ea8d","clientVersion":"0.0.3879","searchFilterCounts":[{"language":"en","tag":"API \u0026 Integrations","count":14},{"language":"es","tag":"API e Integraciones","count":14},{"language":"pt","tag":"API \u0026 Integrações","count":14},{"language":"en","tag":"Administration","count":12},{"language":"en","tag":"Integrations","count":12},{"language":"es","tag":"Administración","count":12},{"language":"es","tag":"Integraciones","count":12},{"language":"pt","tag":"Administração","count":12},{"language":"pt","tag":"Integrações","count":12},{"language":"en","tag":"User Guide","count":11},{"language":"es","tag":"Guía del Usuario","count":11},{"language":"pt","tag":"Guia do Usuário","count":11},{"language":"en","tag":"FAQ \u0026 Support","count":9},{"language":"es","tag":"FAQ y Soporte","count":9},{"language":"pt","tag":"FAQ \u0026 Suporte","count":9},{"language":"en","tag":"Setup","count":4},{"language":"en","tag":"FAQ","count":4},{"language":"es","tag":"Configuración","count":4},{"language":"es","tag":"Preguntas Frecuentes","count":4},{"language":"pt","tag":"Configuração","count":4},{"language":"pt","tag":"Perguntas Frequentes","count":4},{"language":"en","tag":"Billing","count":3},{"language":"en","tag":"Customization","count":3},{"language":"en","tag":"Getting Started","count":3},{"language":"es","tag":"Facturación","count":3},{"language":"es","tag":"Personalización","count":3},{"language":"es","tag":"Empezando","count":3},{"language":"pt","tag":"Faturamento","count":3},{"language":"pt","tag":"Personalização","count":3},{"language":"pt","tag":"Começando","count":3}]},"assistantConfig":{"enableAskAiButton":false,"enableStarterQuestions":false,"enableContextualStarterQuestions":false,"enableAskAiSearchBar":true},"hasChatPermissions":false,"hasWebMcpPermissions":false,"toggles":[{"name":"kill-isr","enabled":true,"variant":{"name":"disabled","enabled":false,"feature_enabled":true},"impressionData":false},{"name":"agent-mintlify-slack","enabled":true,"variant":{"name":"disabled","enabled":false,"feature_enabled":true},"impressionData":false},{"name":"editor-v7-file-tree","enabled":true,"variant":{"name":"disabled","enabled":false,"feature_enabled":true},"impressionData":false},{"name":"agent-integrations-settings","enabled":true,"variant":{"name":"disabled","enabled":false,"feature_enabled":true},"impressionData":false},{"name":"automations-pr-grouping","enabled":true,"variant":{"name":"disabled","enabled":false,"feature_enabled":true},"impressionData":false},{"name":"custom-prefix","enabled":true,"variant":{"name":"disabled","enabled":false,"feature_enabled":true},"impressionData":false},{"name":"analytics-v7","enabled":true,"variant":{"name":"disabled","enabled":false,"feature_enabled":true},"impressionData":false},{"name":"user-flows-analytics","enabled":true,"variant":{"name":"disabled","enabled":false,"feature_enabled":true},"impressionData":false},{"name":"no-publish-flow","enabled":true,"variant":{"name":"disabled","enabled":false,"feature_enabled":true},"impressionData":false},{"name":"llms-txt-v2","enabled":true,"variant":{"name":"disabled","enabled":false,"feature_enabled":true},"impressionData":false},{"name":"pause-universal-search-reconcile","enabled":true,"variant":{"name":"disabled","enabled":false,"feature_enabled":true},"impressionData":false},{"name":"snapshot-serving-live","enabled":true,"variant":{"name":"disabled","enabled":false,"feature_enabled":true},"impressionData":false},{"name":"stripTemperatureMiddleware","enabled":true,"variant":{"name":"disabled","enabled":false,"feature_enabled":true},"impressionData":false},{"name":"per-site-search-delta","enabled":true,"variant":{"name":"disabled","enabled":false,"feature_enabled":true},"impressionData":false},{"name":"support-platform-pylon-zendesk","enabled":true,"variant":{"name":"disabled","enabled":false,"feature_enabled":true},"impressionData":false},{"name":"editor-branches-v2-autocommit","enabled":true,"variant":{"name":"disabled","enabled":false,"feature_enabled":true},"impressionData":false},{"name":"editor-branches-v2","enabled":true,"variant":{"name":"disabled","enabled":false,"feature_enabled":true},"impressionData":false},{"name":"snapshot-serving","enabled":true,"variant":{"name":"disabled","enabled":false,"feature_enabled":true},"impressionData":false},{"name":"instant-rollback","enabled":true,"variant":{"name":"disabled","enabled":false,"feature_enabled":true},"impressionData":false},{"name":"granular-notifications-server","enabled":true,"variant":{"name":"disabled","enabled":false,"feature_enabled":true},"impressionData":false},{"name":"granular-notifications","enabled":true,"variant":{"name":"disabled","enabled":false,"feature_enabled":true},"impressionData":false},{"name":"editor-private-page-search","enabled":true,"variant":{"name":"disabled","enabled":false,"feature_enabled":true},"impressionData":false},{"name":"automations-fable","enabled":true,"variant":{"name":"disabled","enabled":false,"feature_enabled":true},"impressionData":false},{"name":"fixed-ai-action-pricing","enabled":true,"variant":{"name":"disabled","enabled":false,"feature_enabled":true},"impressionData":false},{"name":"automation-resolve-merge-conflict","enabled":true,"variant":{"name":"disabled","enabled":false,"feature_enabled":true},"impressionData":false},{"name":"scoped-publishing","enabled":true,"variant":{"name":"disabled","enabled":false,"feature_enabled":true},"impressionData":false},{"name":"mintql","enabled":true,"variant":{"name":"disabled","enabled":false,"feature_enabled":true},"impressionData":false},{"name":"page-level-analytics","enabled":true,"variant":{"name":"disabled","enabled":false,"feature_enabled":true},"impressionData":false},{"name":"teamspace","enabled":true,"variant":{"name":"disabled","enabled":false,"feature_enabled":true},"impressionData":false},{"name":"editor-version-history-v2","enabled":true,"variant":{"name":"disabled","enabled":false,"feature_enabled":true},"impressionData":false},{"name":"vite-origin","enabled":true,"variant":{"name":"disabled","enabled":false,"feature_enabled":true},"impressionData":false},{"name":"editor-nav-generations","enabled":true,"variant":{"name":"disabled","enabled":false,"feature_enabled":true},"impressionData":false},{"name":"workspace-projects","enabled":true,"variant":{"name":"disabled","enabled":false,"feature_enabled":true},"impressionData":false},{"name":"assistant-v5","enabled":true,"variant":{"name":"disabled","enabled":false,"feature_enabled":true},"impressionData":false},{"name":"byok-sep-25","enabled":true,"variant":{"name":"disabled","enabled":false,"feature_enabled":true},"impressionData":false},{"name":"revalidation-jwt","enabled":true,"variant":{"name":"disabled","enabled":false,"feature_enabled":true},"impressionData":false},{"name":"editor-agent-model-picker","enabled":true,"variant":{"name":"disabled","enabled":false,"feature_enabled":true},"impressionData":false},{"name":"client-snapshot-docs-config","enabled":true,"variant":{"name":"disabled","enabled":false,"feature_enabled":true},"impressionData":false},{"name":"hobby-abuse-scan","enabled":true,"variant":{"name":"disabled","enabled":false,"feature_enabled":true},"impressionData":false}],"isAtlas":false,"googleFontsInlined":false},"customCss":[],"page":{"pagePath":"api/integrations/cvcrm","slug":"/api/integrations/cvcrm","pageMetadata":{"title":"CVCRM Integration — Commission Payments","description":"How to connect your CVCRM to Play2sell PAY and pay commissions automatically — credentials, webhooks, payment method, receipt, lifecycle, testing, FAQ, and troubleshooting. Screen-by-screen setup, no coding.","icon":"building","href":"/api/integrations/cvcrm"},"description":{"compiledSource":"\"use strict\";\nconst {jsx: _jsx} = arguments[0];\nconst {useMDXComponents: _provideComponents} = arguments[0];\nfunction _createMdxContent(props) {\n const _components = {\n p: \"p\",\n ..._provideComponents(),\n ...props.components\n };\n return _jsx(_components.p, {\n children: \"How to connect your CVCRM to Play2sell PAY and pay commissions automatically — credentials, webhooks, payment method, receipt, lifecycle, testing, FAQ, and troubleshooting. Screen-by-screen setup, no coding.\"\n });\n}\nfunction MDXContent(props = {}) {\n const {wrapper: MDXLayout} = {\n ..._provideComponents(),\n ...props.components\n };\n return MDXLayout ? _jsx(MDXLayout, {\n ...props,\n children: _jsx(_createMdxContent, {\n ...props\n })\n }) : _createMdxContent(props);\n}\nreturn {\n default: MDXContent\n};\n","frontmatter":{},"scope":{}},"pageType":"default","mdx":{"mdxSource":{"compiledSource":"\"use strict\";const{Fragment:_Fragment,jsx:_jsx,jsxs:_jsxs}=arguments[0];const{useMDXComponents:_provideComponents}=arguments[0];function _createMdxContent(props){const _components={a:`a`,annotation:`annotation`,code:`code`,li:`li`,math:`math`,mi:`mi`,mn:`mn`,mo:`mo`,mover:`mover`,mrow:`mrow`,p:`p`,semantics:`semantics`,span:`span`,strong:`strong`,tbody:`tbody`,td:`td`,th:`th`,thead:`thead`,tr:`tr`,ul:`ul`,..._provideComponents(),...props.components},{Accordion,AccordionGroup,Check,Frame,Heading,Note,OptimizedImage,Step,Steps,Table,Tip,Warning}=_components;if(!Accordion)_missingMdxReference(`Accordion`,true);if(!AccordionGroup)_missingMdxReference(`AccordionGroup`,true);if(!Check)_missingMdxReference(`Check`,true);if(!Frame)_missingMdxReference(`Frame`,true);if(!Heading)_missingMdxReference(`Heading`,true);if(!Note)_missingMdxReference(`Note`,true);if(!OptimizedImage)_missingMdxReference(`OptimizedImage`,true);if(!Step)_missingMdxReference(`Step`,true);if(!Steps)_missingMdxReference(`Steps`,true);if(!Table)_missingMdxReference(`Table`,true);if(!Tip)_missingMdxReference(`Tip`,true);if(!Warning)_missingMdxReference(`Warning`,true);return _jsxs(_Fragment,{children:[_jsxs(_components.p,{children:[`The `,_jsx(_components.strong,{children:`CVCRM × Commission Payments integration`}),` connects your `,_jsx(_components.strong,{children:`CVCRM`}),` to `,_jsx(_components.strong,{children:`Play2sell PAY`}),` to issue the sale’s boleto to the buyer and `,_jsx(_components.strong,{children:`pay commissions automatically`}),` — with the boleto, settlement, deed registration, and receipt reflected back in your CVCRM. Setup is done `,_jsx(_components.strong,{children:`screen by screen, with no coding`}),`, and takes about `,_jsx(_components.strong,{children:`15 minutes`}),`.`]}),`\n`,_jsx(Heading,{level:`2`,id:`what-you’ll-set-up`,children:`What you’ll set up`}),`\n`,_jsxs(Steps,{children:[_jsx(Step,{title:`In CVCRM`,children:_jsxs(_components.p,{children:[`Generate an `,_jsx(_components.strong,{children:`API token`}),`, create `,_jsx(_components.strong,{children:`3 webhooks`}),`, and make sure the commission uses the `,_jsx(_components.strong,{children:`Boleto payment method`}),`.`]})}),_jsx(Step,{title:`In the Play2sell panel`,children:_jsxs(_components.p,{children:[_jsx(_components.strong,{children:`Connect`}),` the CVCRM (credentials + situation mapping) and `,_jsx(_components.strong,{children:`copy the webhook URL`}),`.`]})})]}),`\n`,_jsxs(Table,{children:[_jsx(_components.thead,{children:_jsxs(_components.tr,{children:[_jsx(_components.th,{children:`Step`}),_jsx(_components.th,{children:`What you do`}),_jsx(_components.th,{children:`Result`})]})}),_jsxs(_components.tbody,{children:[_jsxs(_components.tr,{children:[_jsx(_components.td,{\"data-numeric\":`true`,children:_jsx(_components.strong,{children:`1`})}),_jsx(_components.td,{children:`Generate a token in CVCRM`}),_jsx(_components.td,{children:`the connection’s API credential`})]}),_jsxs(_components.tr,{children:[_jsx(_components.td,{\"data-numeric\":`true`,children:_jsx(_components.strong,{children:`2`})}),_jsx(_components.td,{children:`Connect the CVCRM in the Play2sell panel`}),_jsx(_components.td,{children:`integration configured`})]}),_jsxs(_components.tr,{children:[_jsx(_components.td,{\"data-numeric\":`true`,children:_jsx(_components.strong,{children:`3`})}),_jsx(_components.td,{children:`Copy your webhook URL`}),_jsx(_components.td,{children:`the address CVCRM uses to notify Play2sell`})]}),_jsxs(_components.tr,{children:[_jsx(_components.td,{\"data-numeric\":`true`,children:_jsx(_components.strong,{children:`4`})}),_jsx(_components.td,{children:`Create 3 webhooks in CVCRM`}),_jsx(_components.td,{children:`CVCRM starts notifying each event`})]}),_jsxs(_components.tr,{children:[_jsx(_components.td,{\"data-numeric\":`true`,children:_jsx(_components.strong,{children:`5`})}),_jsx(_components.td,{children:`Test with a sale`}),_jsx(_components.td,{children:`confirms the end-to-end flow`})]})]})]}),`\n`,_jsxs(Note,{children:[_jsx(_components.p,{children:_jsx(_components.strong,{children:`Prerequisites`})}),_jsxs(_components.ul,{children:[`\n`,_jsxs(_components.li,{children:[_jsx(_components.strong,{children:`Administrative`}),` access to your CVCRM manager (`,_jsx(_components.code,{children:`yourcompany.cvcrm.com.br/gestor`}),`).`]}),`\n`,_jsxs(_components.li,{children:[`A dedicated `,_jsx(_components.strong,{children:`API user`}),` (CVCRM recommends naming it `,_jsx(_components.strong,{children:`“Integração”`}),`, so the history stays attributable). If you’ll use the `,_jsx(_components.strong,{children:`transfer receipt`}),` (Step 2.4), this user must be a `,_jsx(_components.strong,{children:`manager with a panel access password`}),`.`]}),`\n`,_jsxs(_components.li,{children:[`The `,_jsx(_components.strong,{children:`situations`}),` (statuses) you use for `,_jsx(_components.strong,{children:`sale`}),`, `,_jsx(_components.strong,{children:`deed registration`}),`, and `,_jsx(_components.strong,{children:`cancellation/contract termination`}),` already configured in CVCRM.`]}),`\n`,_jsxs(_components.li,{children:[_jsx(_components.strong,{children:`Play2sell PAY`}),` enabled on your account (if unsure, contact support).`]}),`\n`]})]}),`\n`,_jsx(Heading,{level:`2`,id:`how-does-the-integration-work`,children:`How does the integration work?`}),`\n`,_jsxs(_components.p,{children:[`The `,_jsx(_components.strong,{children:`CVCRM is the source of truth`}),` for the sale, the parties, the commission split, and the deed registration. `,_jsx(_components.strong,{children:`Play2sell PAY`}),` issues the boleto to the buyer, holds the funds in custody, and distributes the commissions. The two systems stay in sync via `,_jsx(_components.strong,{children:`webhooks`}),` (CVCRM signals when something changes) and `,_jsx(_components.strong,{children:`write-backs`}),` (Play2sell reports the result back in CVCRM).`]}),`\n`,_jsxs(Steps,{children:[_jsx(Step,{title:`CVCRM creates the contract`,children:_jsx(_components.p,{children:`When the sale is registered, CVCRM has the amount, the beneficiaries, the number of installments, and the due dates.`})}),_jsx(Step,{title:`Play2sell issues the boleto`,children:_jsxs(_components.p,{children:[`Play2sell originates the sale and issues a `,_jsx(_components.strong,{children:`boleto (with Pix)`}),` to the buyer.`]})}),_jsx(Step,{title:`The boleto goes back to CVCRM`,children:_jsxs(_components.p,{children:[`The issued boleto is written back to the reservation’s `,_jsx(_components.strong,{children:`commission`}),` (situation “Programado”).`]})}),_jsx(Step,{title:`Buyer pays → CVCRM receives settlement`,children:_jsxs(_components.p,{children:[`Upon payment confirmation, Play2sell reports the `,_jsx(_components.strong,{children:`paid`}),` status back to CVCRM.`]})}),_jsx(Step,{title:`CVCRM registers the deed → the transfer is released`,children:_jsx(_components.p,{children:`When the commission’s deed is registered, Play2sell releases and distributes the transfer to the beneficiaries.`})}),_jsx(Step,{title:`Play2sell pays and attaches the receipt`,children:_jsxs(_components.p,{children:[`Transfer via `,_jsx(_components.strong,{children:`PIX`}),` to each beneficiary; the `,_jsx(_components.strong,{children:`receipt`}),` is attached to the commission in CVCRM. On contract termination, the amount is refunded.`]})})]}),`\n`,_jsx(Note,{children:_jsxs(_components.p,{children:[_jsx(_components.strong,{children:`Safe synchronization.`}),` CVCRM webhooks are `,_jsx(_components.strong,{children:`thin`}),` — they carry only an identifier (e.g., `,_jsx(_components.code,{children:`{\"idreserva\": 123}`}),`). Play2sell uses that signal merely as a trigger and `,_jsx(_components.strong,{children:`fetches the full record back`}),` from the CVCRM API, authenticated, before acting. That’s why a forged webhook can’t inject data.`]})}),`\n`,_jsx(Warning,{children:_jsxs(_components.p,{children:[_jsx(_components.strong,{children:`Identity is by CPF/CNPJ, never by email.`}),` Buyers and beneficiaries are resolved by `,_jsx(_components.strong,{children:`document`}),`. Make sure brokers, the real estate agency, and other beneficiaries have their CPF/CNPJ filled in within CVCRM.`]})}),`\n`,_jsx(Heading,{level:`2`,id:`step-1-—-get-the-credentials-in-cvcrm-email-+-token`,children:`Step 1 — Get the credentials in CVCRM (email + token)`}),`\n`,_jsxs(_components.p,{children:[`The connection needs three values from your CVCRM: `,_jsx(_components.strong,{children:`domain`}),`, `,_jsx(_components.strong,{children:`email`}),`, and `,_jsx(_components.strong,{children:`token`}),`.`]}),`\n`,_jsxs(Steps,{children:[_jsx(Step,{title:`Open Usuários Administrativos`,children:_jsxs(_components.p,{children:[`In the CVCRM manager, click the gear ⚙ (top-right corner) and go to `,_jsx(_components.strong,{children:`Usuários Administrativos`}),` (Administrative Users).`]})}),_jsxs(Step,{title:`Open the integration user's options`,children:[_jsxs(_components.p,{children:[`Find the integration user in the list and, under `,_jsx(_components.strong,{children:`Opções`}),` (Options), choose `,_jsx(_components.strong,{children:`Tokens`}),`.`]}),_jsx(Frame,{caption:`CVCRM manager → Usuários Administrativos → user list`,children:_jsx(OptimizedImage,{src:`https://mintcdn.com/play2sell/UX439KPh_mD83OMk/images/integrations/cvcrm/09-cvcrm-usuarios.png?fit=max\u0026auto=format\u0026n=UX439KPh_mD83OMk\u0026q=85\u0026s=52da52556f8d82a578af4adc3efcff43`,alt:`CVCRM Administrative Users page`,\"data-og-width\":`1650`,width:`1650`,\"data-og-height\":`544`,height:`544`,\"data-path\":`images/integrations/cvcrm/09-cvcrm-usuarios.png`,\"data-optimize\":`true`,\"data-opv\":`3`,srcset:`https://mintcdn.com/play2sell/UX439KPh_mD83OMk/images/integrations/cvcrm/09-cvcrm-usuarios.png?w=280\u0026fit=max\u0026auto=format\u0026n=UX439KPh_mD83OMk\u0026q=85\u0026s=2f0dabeb55d01753ff21d37422b04eba 280w, https://mintcdn.com/play2sell/UX439KPh_mD83OMk/images/integrations/cvcrm/09-cvcrm-usuarios.png?w=560\u0026fit=max\u0026auto=format\u0026n=UX439KPh_mD83OMk\u0026q=85\u0026s=5dfc055a978a55960d070f032cc7c2ca 560w, https://mintcdn.com/play2sell/UX439KPh_mD83OMk/images/integrations/cvcrm/09-cvcrm-usuarios.png?w=840\u0026fit=max\u0026auto=format\u0026n=UX439KPh_mD83OMk\u0026q=85\u0026s=d79645e88b9cf8f7e412c44b66878604 840w, https://mintcdn.com/play2sell/UX439KPh_mD83OMk/images/integrations/cvcrm/09-cvcrm-usuarios.png?w=1100\u0026fit=max\u0026auto=format\u0026n=UX439KPh_mD83OMk\u0026q=85\u0026s=c16d00a99e68e4f1e96485a29021763c 1100w, https://mintcdn.com/play2sell/UX439KPh_mD83OMk/images/integrations/cvcrm/09-cvcrm-usuarios.png?w=1650\u0026fit=max\u0026auto=format\u0026n=UX439KPh_mD83OMk\u0026q=85\u0026s=17cc5d3328e8de89c0e8b698cf1db119 1650w, https://mintcdn.com/play2sell/UX439KPh_mD83OMk/images/integrations/cvcrm/09-cvcrm-usuarios.png?w=2500\u0026fit=max\u0026auto=format\u0026n=UX439KPh_mD83OMk\u0026q=85\u0026s=82b56327fe4ebbd6ba79093ebe9ffb69 2500w`})})]}),_jsxs(Step,{title:`Generate and copy the token`,children:[_jsxs(_components.p,{children:[`Fill in the `,_jsx(_components.strong,{children:`Descrição`}),` (Description, e.g., `,_jsx(_components.code,{children:`Play2sell`}),`), choose the `,_jsx(_components.strong,{children:`Validade do Token`}),` (token expiry), and click `,_jsx(_components.strong,{children:`Gerar token`}),` (Generate token). The token appears in the `,_jsx(_components.strong,{children:`Listagem de Tokens`}),` (token list) — under `,_jsx(_components.strong,{children:`Ações → Copiar Token`}),` (Actions → Copy Token), copy it.`]}),_jsx(Frame,{caption:`Tokens screen — generate and, under Ações → Copiar Token, copy`,children:_jsx(OptimizedImage,{src:`https://mintcdn.com/play2sell/UX439KPh_mD83OMk/images/integrations/cvcrm/10-cvcrm-token.png?fit=max\u0026auto=format\u0026n=UX439KPh_mD83OMk\u0026q=85\u0026s=d722dfbaad33d15838e2bfd866a31fa7`,alt:`Generating and copying the token in CVCRM (Ações → Copiar Token)`,\"data-og-width\":`1658`,width:`1658`,\"data-og-height\":`1272`,height:`1272`,\"data-path\":`images/integrations/cvcrm/10-cvcrm-token.png`,\"data-optimize\":`true`,\"data-opv\":`3`,srcset:`https://mintcdn.com/play2sell/UX439KPh_mD83OMk/images/integrations/cvcrm/10-cvcrm-token.png?w=280\u0026fit=max\u0026auto=format\u0026n=UX439KPh_mD83OMk\u0026q=85\u0026s=814e5b78c6bf952e6b5fbdc432b96533 280w, https://mintcdn.com/play2sell/UX439KPh_mD83OMk/images/integrations/cvcrm/10-cvcrm-token.png?w=560\u0026fit=max\u0026auto=format\u0026n=UX439KPh_mD83OMk\u0026q=85\u0026s=a59b1c36b6ccb9efd4d11bbbe3a55ab4 560w, https://mintcdn.com/play2sell/UX439KPh_mD83OMk/images/integrations/cvcrm/10-cvcrm-token.png?w=840\u0026fit=max\u0026auto=format\u0026n=UX439KPh_mD83OMk\u0026q=85\u0026s=7214f8224ff3cce0f047507d43eba567 840w, https://mintcdn.com/play2sell/UX439KPh_mD83OMk/images/integrations/cvcrm/10-cvcrm-token.png?w=1100\u0026fit=max\u0026auto=format\u0026n=UX439KPh_mD83OMk\u0026q=85\u0026s=6781a266514c592d458585cec37f8f07 1100w, https://mintcdn.com/play2sell/UX439KPh_mD83OMk/images/integrations/cvcrm/10-cvcrm-token.png?w=1650\u0026fit=max\u0026auto=format\u0026n=UX439KPh_mD83OMk\u0026q=85\u0026s=d79a5a5d03a38dbfb3ff87e23f972783 1650w, https://mintcdn.com/play2sell/UX439KPh_mD83OMk/images/integrations/cvcrm/10-cvcrm-token.png?w=2500\u0026fit=max\u0026auto=format\u0026n=UX439KPh_mD83OMk\u0026q=85\u0026s=52ec31ce5d94276ee33ddade2140c00a 2500w`})})]}),_jsx(Step,{title:`Note the email and domain`,children:_jsxs(_components.ul,{children:[`\n`,_jsxs(_components.li,{children:[_jsx(_components.strong,{children:`Email:`}),` the administrative user’s email (must belong to the same CVCRM domain).`]}),`\n`,_jsxs(_components.li,{children:[_jsx(_components.strong,{children:`Domain:`}),` your account’s subdomain — the part `,_jsx(_components.strong,{children:`before`}),` `,_jsx(_components.code,{children:`.cvcrm.com.br`}),` (e.g., in `,_jsx(_components.code,{children:`yourcompany.cvcrm.com.br`}),`, the domain is `,_jsx(_components.code,{children:`yourcompany`}),`).`]}),`\n`]})})]}),`\n`,_jsxs(Check,{children:[`You have `,_jsx(_components.strong,{children:`domain`}),`, `,_jsx(_components.strong,{children:`email`}),`, and `,_jsx(_components.strong,{children:`token`}),` in hand — the three values for Step 2.`]}),`\n`,_jsx(Note,{children:_jsxs(_components.p,{children:[`The `,_jsx(_components.strong,{children:`token is sensitive`}),` — treat it like a password. To rotate it later, generate a new one in CVCRM and update the connection in the Play2sell panel.`]})}),`\n`,_jsx(Heading,{level:`2`,id:`step-2-—-connect-in-the-play2sell-panel`,children:`Step 2 — Connect in the Play2sell panel`}),`\n`,_jsxs(_components.p,{children:[`In the Play2sell panel, go to `,_jsx(_components.strong,{children:`Integrações → Conectores`}),` (Integrations → Connectors), find `,_jsx(_components.strong,{children:`CVCRM`}),`, and click `,_jsx(_components.strong,{children:`Conectar`}),` (Connect).`]}),`\n`,_jsx(Frame,{caption:`Integrações → Conectores → CVCRM`,children:_jsx(OptimizedImage,{src:`https://mintcdn.com/play2sell/UX439KPh_mD83OMk/images/integrations/cvcrm/01-conectores.png?fit=max\u0026auto=format\u0026n=UX439KPh_mD83OMk\u0026q=85\u0026s=32092647dee9db29cb24f393f7f89606`,alt:`CVCRM connector card`,\"data-og-width\":`1320`,width:`1320`,\"data-og-height\":`854`,height:`854`,\"data-path\":`images/integrations/cvcrm/01-conectores.png`,\"data-optimize\":`true`,\"data-opv\":`3`,srcset:`https://mintcdn.com/play2sell/UX439KPh_mD83OMk/images/integrations/cvcrm/01-conectores.png?w=280\u0026fit=max\u0026auto=format\u0026n=UX439KPh_mD83OMk\u0026q=85\u0026s=433ca2eb4fd721d94e9ce2f67e127d9e 280w, https://mintcdn.com/play2sell/UX439KPh_mD83OMk/images/integrations/cvcrm/01-conectores.png?w=560\u0026fit=max\u0026auto=format\u0026n=UX439KPh_mD83OMk\u0026q=85\u0026s=b0b4bcc4f4921a2be89d66a8f4fd1ec7 560w, https://mintcdn.com/play2sell/UX439KPh_mD83OMk/images/integrations/cvcrm/01-conectores.png?w=840\u0026fit=max\u0026auto=format\u0026n=UX439KPh_mD83OMk\u0026q=85\u0026s=eb829f2034de28dd1835dd8bc2848d19 840w, https://mintcdn.com/play2sell/UX439KPh_mD83OMk/images/integrations/cvcrm/01-conectores.png?w=1100\u0026fit=max\u0026auto=format\u0026n=UX439KPh_mD83OMk\u0026q=85\u0026s=f35ceec1269be95f7e94e8973c3e23f8 1100w, https://mintcdn.com/play2sell/UX439KPh_mD83OMk/images/integrations/cvcrm/01-conectores.png?w=1650\u0026fit=max\u0026auto=format\u0026n=UX439KPh_mD83OMk\u0026q=85\u0026s=a86e03521b50ed372abd0cc9132f21b7 1650w, https://mintcdn.com/play2sell/UX439KPh_mD83OMk/images/integrations/cvcrm/01-conectores.png?w=2500\u0026fit=max\u0026auto=format\u0026n=UX439KPh_mD83OMk\u0026q=85\u0026s=7f42b30a72aeed0e952619ae39caeed4 2500w`})}),`\n`,_jsx(_components.p,{children:`The form has five blocks. Fill in each one as described below.`}),`\n`,_jsx(Frame,{caption:`“Conectar CRM/ERP” modal — complete form`,children:_jsx(OptimizedImage,{src:`https://mintcdn.com/play2sell/UX439KPh_mD83OMk/images/integrations/cvcrm/02-conectar-modal.png?fit=max\u0026auto=format\u0026n=UX439KPh_mD83OMk\u0026q=85\u0026s=55be8ae29645a865c7c64eb727d0516f`,alt:`Connect CRM/ERP form: credentials, situation mapping, exit situation, and transfer receipt`,\"data-og-width\":`670`,width:`670`,\"data-og-height\":`1160`,height:`1160`,\"data-path\":`images/integrations/cvcrm/02-conectar-modal.png`,\"data-optimize\":`true`,\"data-opv\":`3`,srcset:`https://mintcdn.com/play2sell/UX439KPh_mD83OMk/images/integrations/cvcrm/02-conectar-modal.png?w=280\u0026fit=max\u0026auto=format\u0026n=UX439KPh_mD83OMk\u0026q=85\u0026s=b8d0119956e25ec9997775f7b65f590c 280w, https://mintcdn.com/play2sell/UX439KPh_mD83OMk/images/integrations/cvcrm/02-conectar-modal.png?w=560\u0026fit=max\u0026auto=format\u0026n=UX439KPh_mD83OMk\u0026q=85\u0026s=96a04f8370aa9df65bbba530b54d4c6f 560w, https://mintcdn.com/play2sell/UX439KPh_mD83OMk/images/integrations/cvcrm/02-conectar-modal.png?w=840\u0026fit=max\u0026auto=format\u0026n=UX439KPh_mD83OMk\u0026q=85\u0026s=b8d18aa01513bd63b161639622638d31 840w, https://mintcdn.com/play2sell/UX439KPh_mD83OMk/images/integrations/cvcrm/02-conectar-modal.png?w=1100\u0026fit=max\u0026auto=format\u0026n=UX439KPh_mD83OMk\u0026q=85\u0026s=eb396b75a096786a58b4e3bf292a2b04 1100w, https://mintcdn.com/play2sell/UX439KPh_mD83OMk/images/integrations/cvcrm/02-conectar-modal.png?w=1650\u0026fit=max\u0026auto=format\u0026n=UX439KPh_mD83OMk\u0026q=85\u0026s=a70cc714ee9547d2a8c89c6fdce8977a 1650w, https://mintcdn.com/play2sell/UX439KPh_mD83OMk/images/integrations/cvcrm/02-conectar-modal.png?w=2500\u0026fit=max\u0026auto=format\u0026n=UX439KPh_mD83OMk\u0026q=85\u0026s=f5c9eadae5db6aa1eb071440102802e6 2500w`})}),`\n`,_jsx(Heading,{level:`3`,id:`2-1-—-credentials`,children:`2.1 — Credentials`}),`\n`,_jsx(_components.p,{children:`Fill in the three values from Step 1:`}),`\n`,_jsxs(Table,{children:[_jsx(_components.thead,{children:_jsxs(_components.tr,{children:[_jsx(_components.th,{children:`Field`}),_jsx(_components.th,{children:`What to enter`})]})}),_jsxs(_components.tbody,{children:[_jsxs(_components.tr,{children:[_jsx(_components.td,{children:_jsx(_components.strong,{children:`Domínio`})}),_jsxs(_components.td,{children:[`The subdomain before `,_jsx(_components.code,{children:`.cvcrm.com.br`}),` (e.g., `,_jsx(_components.code,{children:`yourcompany`}),`).`]})]}),_jsxs(_components.tr,{children:[_jsx(_components.td,{children:_jsx(_components.strong,{children:`E-mail de integração`})}),_jsx(_components.td,{children:`The API user’s email.`})]}),_jsxs(_components.tr,{children:[_jsx(_components.td,{children:_jsx(_components.strong,{children:`Token`})}),_jsx(_components.td,{children:`The token generated in CVCRM (stored securely; not shown again afterward).`})]})]})]}),`\n`,_jsx(Heading,{level:`3`,id:`2-2-—-situation-mapping`,children:`2.2 — Situation mapping`}),`\n`,_jsxs(_components.p,{children:[`Here you tell Play2sell `,_jsx(_components.strong,{children:`which situation in your CVCRM`}),` corresponds to each action. Enter the `,_jsx(_components.strong,{children:`name`}),` (or the id) of the situation, `,_jsx(_components.strong,{children:`exactly`}),` as it appears in your CVCRM.`]}),`\n`,_jsxs(Table,{children:[_jsx(_components.thead,{children:_jsxs(_components.tr,{children:[_jsx(_components.th,{children:`Field`}),_jsx(_components.th,{children:`When to use`}),_jsx(_components.th,{children:`Action it triggers`})]})}),_jsxs(_components.tbody,{children:[_jsxs(_components.tr,{children:[_jsx(_components.td,{children:_jsx(_components.strong,{children:`Vendida`})}),_jsxs(_components.td,{children:[`The `,_jsx(_components.strong,{children:`reservation`}),` situation that indicates a confirmed sale.`]}),_jsx(_components.td,{children:`Originates the sale and issues the boleto.`})]}),_jsxs(_components.tr,{children:[_jsx(_components.td,{children:_jsx(_components.strong,{children:`Escriturada`})}),_jsxs(_components.td,{children:[`(Optional) The `,_jsx(_components.strong,{children:`reservation`}),` situation when deed registration is recorded on the reservation itself.`]}),_jsx(_components.td,{children:`Releases the transfer.`})]}),_jsxs(_components.tr,{children:[_jsx(_components.td,{children:_jsx(_components.strong,{children:`Distrato`})}),_jsxs(_components.td,{children:[`(Optional) The `,_jsx(_components.strong,{children:`reservation`}),` situation for cancellation/contract termination.`]}),_jsx(_components.td,{children:`Refund.`})]}),_jsxs(_components.tr,{children:[_jsx(_components.td,{children:_jsx(_components.strong,{children:`Escriturada (via comissão)`})}),_jsxs(_components.td,{children:[`Use when deed registration in your CVCRM is a `,_jsx(_components.strong,{children:`commission`}),` situation (e.g., “Escriturar”), not a reservation one.`]}),_jsx(_components.td,{children:`Releases the transfer.`})]}),_jsxs(_components.tr,{children:[_jsx(_components.td,{children:_jsx(_components.strong,{children:`Cancelada (via comissão)`})}),_jsxs(_components.td,{children:[`(Optional) The `,_jsx(_components.strong,{children:`commission`}),` situation that triggers termination/refund.`]}),_jsx(_components.td,{children:`Refund.`})]})]})]}),`\n`,_jsx(Warning,{children:_jsxs(_components.p,{children:[`Use the `,_jsx(_components.strong,{children:`exact label`}),` from your instance. Situations are configurable and vary from company to company — “Vendida”, “Venda Realizada”, “Aprovada”, etc. Copy the text as it appears in your CVCRM.`]})}),`\n`,_jsx(Tip,{children:_jsxs(_components.p,{children:[`Many operations record deed registration `,_jsx(_components.strong,{children:`on the commission`}),` (situation “Escriturar”), not on the reservation. In that case, leave `,_jsx(_components.strong,{children:`Escriturada`}),` blank and fill in `,_jsx(_components.strong,{children:`Escriturada (via comissão)`}),`.`]})}),`\n`,_jsx(Heading,{level:`3`,id:`2-3-—-exit-situation-write-back`,children:`2.3 — Exit situation (write-back)`}),`\n`,_jsxs(_components.p,{children:[`The `,_jsx(_components.strong,{children:`write-back`}),` is when Play2sell reports the result back in CVCRM. These fields say `,_jsx(_components.strong,{children:`which situation your CVCRM should take on`}),` for each event. They are `,_jsx(_components.strong,{children:`optional`}),`.`]}),`\n`,_jsxs(Table,{children:[_jsx(_components.thead,{children:_jsxs(_components.tr,{children:[_jsx(_components.th,{children:`Field`}),_jsx(_components.th,{children:`Meaning`}),_jsx(_components.th,{children:`Example`})]})}),_jsxs(_components.tbody,{children:[_jsxs(_components.tr,{children:[_jsx(_components.td,{children:_jsx(_components.strong,{children:`Comissão com boleto`})}),_jsxs(_components.td,{children:[`The commission payment situation `,_jsx(_components.strong,{children:`when the boleto is issued`}),`.`]}),_jsx(_components.td,{children:_jsx(_components.code,{children:`Programado`})})]}),_jsxs(_components.tr,{children:[_jsx(_components.td,{children:_jsx(_components.strong,{children:`Comissão paga`})}),_jsxs(_components.td,{children:[`The commission payment situation `,_jsx(_components.strong,{children:`when it is settled`}),` (paid).`]}),_jsx(_components.td,{children:_jsx(_components.code,{children:`Pago`})})]})]})]}),`\n`,_jsx(Warning,{children:_jsxs(_components.p,{children:[`For the exit situation, always prefer the `,_jsx(_components.strong,{children:`name`}),` (e.g., `,_jsx(_components.code,{children:`Programado`}),`, `,_jsx(_components.code,{children:`Pago`}),`) over the id. The payment situation ids vary per instance and may land on misleading values.`]})}),`\n`,_jsx(Heading,{level:`3`,id:`2-4-—-transfer-receipt-optional`,children:`2.4 — Transfer receipt (optional)`}),`\n`,_jsxs(_components.p,{children:[`Makes Play2sell `,_jsx(_components.strong,{children:`attach the payment receipt (PDF)`}),` to the commission in CVCRM when the transfer is paid. It is `,_jsx(_components.strong,{children:`optional`}),` and requires a `,_jsx(_components.strong,{children:`manager`}),` login in CVCRM.`]}),`\n`,_jsxs(Table,{children:[_jsx(_components.thead,{children:_jsxs(_components.tr,{children:[_jsx(_components.th,{children:`Field`}),_jsx(_components.th,{children:`What to enter`})]})}),_jsxs(_components.tbody,{children:[_jsxs(_components.tr,{children:[_jsx(_components.td,{children:_jsx(_components.strong,{children:`Tipo do comprovante`})}),_jsxs(_components.td,{children:[`The `,_jsx(_components.strong,{children:`file type name`}),` registered in your CVCRM (e.g., `,_jsx(_components.code,{children:`Comprovante_Play2sell`}),`).`]})]}),_jsxs(_components.tr,{children:[_jsx(_components.td,{children:_jsx(_components.strong,{children:`Senha de gestor`})}),_jsxs(_components.td,{children:[`The `,_jsx(_components.strong,{children:`password`}),` of the CVCRM manager user (the same `,_jsx(_components.strong,{children:`E-mail de integração`}),`).`]})]})]})]}),`\n`,_jsxs(Warning,{children:[_jsxs(_components.p,{children:[_jsx(_components.strong,{children:`Credentials the receipt requires.`}),` The attachment uses CVCRM’s `,_jsx(_components.strong,{children:`v3 API`}),`, which — unlike the rest of the integration (which uses the `,_jsx(_components.strong,{children:`token`}),`) — `,_jsx(_components.strong,{children:`logs in with email + password`}),` to the manager panel. Therefore:`]}),_jsxs(_components.ul,{children:[`\n`,_jsxs(_components.li,{children:[`The `,_jsx(_components.strong,{children:`E-mail de integração`}),` (Step 2.1) must belong to a `,_jsx(_components.strong,{children:`manager user`}),` that signs in to the CVCRM panel `,_jsx(_components.strong,{children:`with a password`}),`.`]}),`\n`,_jsxs(_components.li,{children:[`Enter that `,_jsx(_components.strong,{children:`user’s password`}),` in the `,_jsx(_components.strong,{children:`Senha de gestor`}),` field.`]}),`\n`,_jsxs(_components.li,{children:[`Access is `,_jsx(_components.strong,{children:`renewed automatically`}),` — you don’t update anything periodically. If you change the password in CVCRM, update it here too.`]}),`\n`]})]}),`\n`,_jsx(Note,{children:_jsxs(_components.p,{children:[`The `,_jsx(_components.strong,{children:`receipt type must already exist`}),` in your CVCRM, and the `,_jsx(_components.strong,{children:`name`}),` here must be `,_jsx(_components.strong,{children:`identical`}),` to the one registered there. See how to create it in `,_jsx(_components.strong,{children:`Step 4.2`}),`. Without this setup, everything else still works — only the receipt attachment doesn’t happen.`]})}),`\n`,_jsx(Heading,{level:`3`,id:`2-5-—-role-mapping-optional`,children:`2.5 — Role mapping (optional)`}),`\n`,_jsxs(_components.p,{children:[`Translate `,_jsx(_components.strong,{children:`your CVCRM’s commission type`}),` into the beneficiary’s role in Play2sell. On the left, the text as it comes from CVCRM (e.g., `,_jsx(_components.code,{children:`Corretor`}),`); on the right, the role: `,_jsx(_components.code,{children:`VENDEDOR`}),`, `,_jsx(_components.code,{children:`IMOBILIARIA`}),`, `,_jsx(_components.code,{children:`HOUSE`}),`, `,_jsx(_components.code,{children:`GERENTE`}),`, `,_jsx(_components.code,{children:`COORDENADOR`}),`, or `,_jsx(_components.code,{children:`PARCEIRO`}),`. Use `,_jsx(_components.strong,{children:`”+ Adicionar papel”`}),` (+ Add role) to include as many as you need.`]}),`\n`,_jsxs(_components.p,{children:[`Click `,_jsx(_components.strong,{children:`Conectar`}),` to save.`]}),`\n`,_jsxs(Check,{children:[`CVCRM shows as `,_jsx(_components.strong,{children:`connected`}),` in the panel and opens the `,_jsx(_components.strong,{children:`“CRM conectado”`}),` (CRM connected) screen with your webhook URL.`]}),`\n`,_jsx(Heading,{level:`2`,id:`step-3-—-copy-the-webhook-url`,children:`Step 3 — Copy the webhook URL`}),`\n`,_jsxs(_components.p,{children:[`When you click `,_jsx(_components.strong,{children:`Conectar`}),`, Play2sell `,_jsx(_components.strong,{children:`automatically provisions`}),` the receiving endpoint and shows the `,_jsx(_components.strong,{children:`“CRM conectado”`}),` screen with your `,_jsx(_components.strong,{children:`webhook URL`}),` and a `,_jsx(_components.strong,{children:`copy`}),` button. Copy that URL — you’ll paste it into CVCRM in the next step.`]}),`\n`,_jsxs(Note,{children:[_jsxs(_components.p,{children:[`The URL is `,_jsx(_components.strong,{children:`unique to your account`}),`. To retrieve it later, go to `,_jsx(_components.strong,{children:`Integrações → Endpoints`}),` — that’s where the webhook endpoints are listed.`]}),_jsx(Frame,{caption:`Integrações → Endpoints — where the URL is available later`,children:_jsx(OptimizedImage,{src:`https://mintcdn.com/play2sell/UX439KPh_mD83OMk/images/integrations/cvcrm/05-endpoints.png?fit=max\u0026auto=format\u0026n=UX439KPh_mD83OMk\u0026q=85\u0026s=9464f18e7d1cbb6e2b6be3a86582ffa8`,alt:`Endpoints page in the Play2sell panel`,\"data-og-width\":`1680`,width:`1680`,\"data-og-height\":`1298`,height:`1298`,\"data-path\":`images/integrations/cvcrm/05-endpoints.png`,\"data-optimize\":`true`,\"data-opv\":`3`,srcset:`https://mintcdn.com/play2sell/UX439KPh_mD83OMk/images/integrations/cvcrm/05-endpoints.png?w=280\u0026fit=max\u0026auto=format\u0026n=UX439KPh_mD83OMk\u0026q=85\u0026s=906d32f557d4b00488fdf6949a75bbab 280w, https://mintcdn.com/play2sell/UX439KPh_mD83OMk/images/integrations/cvcrm/05-endpoints.png?w=560\u0026fit=max\u0026auto=format\u0026n=UX439KPh_mD83OMk\u0026q=85\u0026s=6616508d80342d3d9513bf1337415fb1 560w, https://mintcdn.com/play2sell/UX439KPh_mD83OMk/images/integrations/cvcrm/05-endpoints.png?w=840\u0026fit=max\u0026auto=format\u0026n=UX439KPh_mD83OMk\u0026q=85\u0026s=b3ff1b194791a7e90f404456ece57bc7 840w, https://mintcdn.com/play2sell/UX439KPh_mD83OMk/images/integrations/cvcrm/05-endpoints.png?w=1100\u0026fit=max\u0026auto=format\u0026n=UX439KPh_mD83OMk\u0026q=85\u0026s=da930a1d3c145c7c53e1529b27b26de4 1100w, https://mintcdn.com/play2sell/UX439KPh_mD83OMk/images/integrations/cvcrm/05-endpoints.png?w=1650\u0026fit=max\u0026auto=format\u0026n=UX439KPh_mD83OMk\u0026q=85\u0026s=324ac82f7bb5f56dd809ce35e17d5020 1650w, https://mintcdn.com/play2sell/UX439KPh_mD83OMk/images/integrations/cvcrm/05-endpoints.png?w=2500\u0026fit=max\u0026auto=format\u0026n=UX439KPh_mD83OMk\u0026q=85\u0026s=16547bf34c023b3882eb03a6d4e58823 2500w`})})]}),`\n`,_jsxs(Check,{children:[`You have the `,_jsx(_components.strong,{children:`webhook URL`}),` copied — ready to paste into CVCRM.`]}),`\n`,_jsx(Heading,{level:`2`,id:`step-4-—-configure-cvcrm`,children:`Step 4 — Configure CVCRM`}),`\n`,_jsx(_components.p,{children:`Here you tell CVCRM to notify Play2sell on each event (4.1) and ensure three supporting settings (4.2, 4.3 and 4.4).`}),`\n`,_jsx(Heading,{level:`3`,id:`4-1-—-create-the-3-webhooks`,children:`4.1 — Create the 3 webhooks`}),`\n`,_jsxs(_components.p,{children:[`In the CVCRM manager, go to `,_jsx(_components.strong,{children:`Configurações ⚙ → Integrações`}),` (Settings → Integrations) and open the `,_jsx(_components.strong,{children:`Webhooks`}),` card (under “Configurar”).`]}),`\n`,_jsx(Frame,{caption:`CVCRM manager → Configurações → Integrações → Webhooks card`,children:_jsx(OptimizedImage,{src:`https://mintcdn.com/play2sell/UX439KPh_mD83OMk/images/integrations/cvcrm/06-cvcrm-integracoes.png?fit=max\u0026auto=format\u0026n=UX439KPh_mD83OMk\u0026q=85\u0026s=5adadd744cd615258faf06cc969227ae`,alt:`CVCRM Integrations hub with the Webhooks card`,\"data-og-width\":`2084`,width:`2084`,\"data-og-height\":`1350`,height:`1350`,\"data-path\":`images/integrations/cvcrm/06-cvcrm-integracoes.png`,\"data-optimize\":`true`,\"data-opv\":`3`,srcset:`https://mintcdn.com/play2sell/UX439KPh_mD83OMk/images/integrations/cvcrm/06-cvcrm-integracoes.png?w=280\u0026fit=max\u0026auto=format\u0026n=UX439KPh_mD83OMk\u0026q=85\u0026s=262b28859ff9af1d630356d518667ac3 280w, https://mintcdn.com/play2sell/UX439KPh_mD83OMk/images/integrations/cvcrm/06-cvcrm-integracoes.png?w=560\u0026fit=max\u0026auto=format\u0026n=UX439KPh_mD83OMk\u0026q=85\u0026s=5d75aa9b0a4fb9ae137784d381af4d95 560w, https://mintcdn.com/play2sell/UX439KPh_mD83OMk/images/integrations/cvcrm/06-cvcrm-integracoes.png?w=840\u0026fit=max\u0026auto=format\u0026n=UX439KPh_mD83OMk\u0026q=85\u0026s=357566b49824f2100a1a3095836a8b30 840w, https://mintcdn.com/play2sell/UX439KPh_mD83OMk/images/integrations/cvcrm/06-cvcrm-integracoes.png?w=1100\u0026fit=max\u0026auto=format\u0026n=UX439KPh_mD83OMk\u0026q=85\u0026s=744b4fe939fb80ac4a351adb7da88a57 1100w, https://mintcdn.com/play2sell/UX439KPh_mD83OMk/images/integrations/cvcrm/06-cvcrm-integracoes.png?w=1650\u0026fit=max\u0026auto=format\u0026n=UX439KPh_mD83OMk\u0026q=85\u0026s=677893d7a1269585af5ffe667a09cbe6 1650w, https://mintcdn.com/play2sell/UX439KPh_mD83OMk/images/integrations/cvcrm/06-cvcrm-integracoes.png?w=2500\u0026fit=max\u0026auto=format\u0026n=UX439KPh_mD83OMk\u0026q=85\u0026s=0da8361314200886b0e69cb5d5e6683a 2500w`})}),`\n`,_jsx(Frame,{caption:`Webhook list in CVCRM`,children:_jsx(OptimizedImage,{src:`https://mintcdn.com/play2sell/UX439KPh_mD83OMk/images/integrations/cvcrm/07-cvcrm-webhooks-lista.png?fit=max\u0026auto=format\u0026n=UX439KPh_mD83OMk\u0026q=85\u0026s=870eab633111f90db91847c2fa9a684c`,alt:`Webhook list in CVCRM`,\"data-og-width\":`1678`,width:`1678`,\"data-og-height\":`1354`,height:`1354`,\"data-path\":`images/integrations/cvcrm/07-cvcrm-webhooks-lista.png`,\"data-optimize\":`true`,\"data-opv\":`3`,srcset:`https://mintcdn.com/play2sell/UX439KPh_mD83OMk/images/integrations/cvcrm/07-cvcrm-webhooks-lista.png?w=280\u0026fit=max\u0026auto=format\u0026n=UX439KPh_mD83OMk\u0026q=85\u0026s=850f277b45991548397fc3a4cc9bb1c6 280w, https://mintcdn.com/play2sell/UX439KPh_mD83OMk/images/integrations/cvcrm/07-cvcrm-webhooks-lista.png?w=560\u0026fit=max\u0026auto=format\u0026n=UX439KPh_mD83OMk\u0026q=85\u0026s=a88fc16ac271d069a040878463af40d6 560w, https://mintcdn.com/play2sell/UX439KPh_mD83OMk/images/integrations/cvcrm/07-cvcrm-webhooks-lista.png?w=840\u0026fit=max\u0026auto=format\u0026n=UX439KPh_mD83OMk\u0026q=85\u0026s=aff50fa7a7768f487ec961f0c8beaa31 840w, https://mintcdn.com/play2sell/UX439KPh_mD83OMk/images/integrations/cvcrm/07-cvcrm-webhooks-lista.png?w=1100\u0026fit=max\u0026auto=format\u0026n=UX439KPh_mD83OMk\u0026q=85\u0026s=b076292402eadeb55dbbe073faad26b1 1100w, https://mintcdn.com/play2sell/UX439KPh_mD83OMk/images/integrations/cvcrm/07-cvcrm-webhooks-lista.png?w=1650\u0026fit=max\u0026auto=format\u0026n=UX439KPh_mD83OMk\u0026q=85\u0026s=2db66d744bfc0ead343aac28a7967949 1650w, https://mintcdn.com/play2sell/UX439KPh_mD83OMk/images/integrations/cvcrm/07-cvcrm-webhooks-lista.png?w=2500\u0026fit=max\u0026auto=format\u0026n=UX439KPh_mD83OMk\u0026q=85\u0026s=0818427af5f1a9c99f1f726052e117eb 2500w`})}),`\n`,_jsxs(_components.p,{children:[`You’ll create `,_jsx(_components.strong,{children:`3 webhooks`}),` — all pointing to the `,_jsx(_components.strong,{children:`same URL`}),` (the one from Step 3). What changes in each is the `,_jsx(_components.strong,{children:`Funcionalidade`}),` (Feature) and the `,_jsx(_components.strong,{children:`trigger situation`}),`:`]}),`\n`,_jsxs(Table,{children:[_jsx(_components.thead,{children:_jsxs(_components.tr,{children:[_jsx(_components.th,{children:`#`}),_jsx(_components.th,{children:`Funcionalidade`}),_jsx(_components.th,{children:`Trigger situation (example)`}),_jsx(_components.th,{children:`Field in the panel (Step 2.2)`}),_jsx(_components.th,{children:`What it triggers`})]})}),_jsxs(_components.tbody,{children:[_jsxs(_components.tr,{children:[_jsx(_components.td,{\"data-numeric\":`true`,children:_jsx(_components.strong,{children:`1`})}),_jsx(_components.td,{children:_jsx(_components.strong,{children:`Reserva`})}),_jsx(_components.td,{children:`sale / send to commission payments`}),_jsx(_components.td,{children:_jsx(_components.strong,{children:`Vendida`})}),_jsx(_components.td,{children:`origination + boleto issuance`})]}),_jsxs(_components.tr,{children:[_jsx(_components.td,{\"data-numeric\":`true`,children:_jsx(_components.strong,{children:`2`})}),_jsx(_components.td,{children:_jsx(_components.strong,{children:`Comissão`})}),_jsx(_components.td,{children:`escriturar`}),_jsx(_components.td,{children:_jsx(_components.strong,{children:`Escriturada (via comissão)`})}),_jsx(_components.td,{children:`releases the transfer (PIX)`})]}),_jsxs(_components.tr,{children:[_jsx(_components.td,{\"data-numeric\":`true`,children:_jsx(_components.strong,{children:`3`})}),_jsx(_components.td,{children:_jsx(_components.strong,{children:`Comissão`})}),_jsx(_components.td,{children:`cancellation`}),_jsx(_components.td,{children:_jsx(_components.strong,{children:`Cancelada (via comissão)`})}),_jsx(_components.td,{children:`cancels the unpaid boleto / refunds the paid one`})]})]})]}),`\n`,_jsxs(_components.p,{children:[`For each one, click `,_jsx(_components.strong,{children:`”+ Criar novo Webhook”`}),` (+ Create new Webhook) and fill in the form:`]}),`\n`,_jsxs(Table,{children:[_jsx(_components.thead,{children:_jsxs(_components.tr,{children:[_jsx(_components.th,{children:`CVCRM field`}),_jsx(_components.th,{children:`What to enter`})]})}),_jsxs(_components.tbody,{children:[_jsxs(_components.tr,{children:[_jsx(_components.td,{children:_jsx(_components.strong,{children:`Nome`})}),_jsxs(_components.td,{children:[`A clear label of your choosing (e.g., `,_jsx(_components.code,{children:`Pagadoria — venda`}),`).`]})]}),_jsxs(_components.tr,{children:[_jsx(_components.td,{children:_jsx(_components.strong,{children:`Funcionalidade`})}),_jsxs(_components.td,{children:[_jsx(_components.strong,{children:`Reserva`}),` (webhook 1) or `,_jsx(_components.strong,{children:`Comissão`}),` (webhooks 2 and 3).`]})]}),_jsxs(_components.tr,{children:[_jsx(_components.td,{children:_jsx(_components.strong,{children:`Workflow`})}),_jsxs(_components.td,{children:[`Appears when the Funcionalidade has more than one situation flow. Under `,_jsx(_components.strong,{children:`Comissão`}),` there is more than one workflow — choose the one that `,_jsx(_components.strong,{children:`contains the trigger situation`}),` (“Escriturar” / “Cancelada”); if unsure, open the selector and see which workflow the situation appears in. Under `,_jsx(_components.strong,{children:`Reserva`}),` there is usually only one.`]})]}),_jsxs(_components.tr,{children:[_jsx(_components.td,{children:_jsx(_components.strong,{children:`Gatilho`})}),_jsxs(_components.td,{children:[`The `,_jsx(_components.strong,{children:`situation`}),` that triggers the send. Use the `,_jsx(_components.strong,{children:`exact label`}),` from your instance (the same as in Step 2.2).`]})]}),_jsxs(_components.tr,{children:[_jsx(_components.td,{children:_jsx(_components.strong,{children:`Forma de envio`})}),_jsx(_components.td,{children:`Leave the default.`})]}),_jsxs(_components.tr,{children:[_jsx(_components.td,{children:_jsx(_components.strong,{children:`Endereço`})}),_jsxs(_components.td,{children:[_jsx(_components.strong,{children:`Paste the webhook URL`}),` copied in Step 3.`]})]}),_jsxs(_components.tr,{children:[_jsx(_components.td,{children:_jsx(_components.strong,{children:`Ativo no painel`})}),_jsxs(_components.td,{children:[`Leave it `,_jsx(_components.strong,{children:`active`}),` — without this, the webhook won’t fire.`]})]})]})]}),`\n`,_jsx(Frame,{caption:`Registering a new webhook in CVCRM`,children:_jsx(OptimizedImage,{src:`https://mintcdn.com/play2sell/UX439KPh_mD83OMk/images/integrations/cvcrm/08-cvcrm-webhook-form.png?fit=max\u0026auto=format\u0026n=UX439KPh_mD83OMk\u0026q=85\u0026s=3c705dd46567c23c85173cd7938a0d93`,alt:`New webhook registration form in CVCRM`,\"data-og-width\":`1680`,width:`1680`,\"data-og-height\":`1358`,height:`1358`,\"data-path\":`images/integrations/cvcrm/08-cvcrm-webhook-form.png`,\"data-optimize\":`true`,\"data-opv\":`3`,srcset:`https://mintcdn.com/play2sell/UX439KPh_mD83OMk/images/integrations/cvcrm/08-cvcrm-webhook-form.png?w=280\u0026fit=max\u0026auto=format\u0026n=UX439KPh_mD83OMk\u0026q=85\u0026s=0143a93142e7089ca94501b7c83d076b 280w, https://mintcdn.com/play2sell/UX439KPh_mD83OMk/images/integrations/cvcrm/08-cvcrm-webhook-form.png?w=560\u0026fit=max\u0026auto=format\u0026n=UX439KPh_mD83OMk\u0026q=85\u0026s=a70c8e432fe801a354b1176bd6ae65ba 560w, https://mintcdn.com/play2sell/UX439KPh_mD83OMk/images/integrations/cvcrm/08-cvcrm-webhook-form.png?w=840\u0026fit=max\u0026auto=format\u0026n=UX439KPh_mD83OMk\u0026q=85\u0026s=abdb217b544bbc3776b652298fedc0a7 840w, https://mintcdn.com/play2sell/UX439KPh_mD83OMk/images/integrations/cvcrm/08-cvcrm-webhook-form.png?w=1100\u0026fit=max\u0026auto=format\u0026n=UX439KPh_mD83OMk\u0026q=85\u0026s=62a0e7066e778d2493dd3e7821a1119e 1100w, https://mintcdn.com/play2sell/UX439KPh_mD83OMk/images/integrations/cvcrm/08-cvcrm-webhook-form.png?w=1650\u0026fit=max\u0026auto=format\u0026n=UX439KPh_mD83OMk\u0026q=85\u0026s=df42e4351b5c28a8315691d7c44a40bd 1650w, https://mintcdn.com/play2sell/UX439KPh_mD83OMk/images/integrations/cvcrm/08-cvcrm-webhook-form.png?w=2500\u0026fit=max\u0026auto=format\u0026n=UX439KPh_mD83OMk\u0026q=85\u0026s=bacd7fa996108644dcdda9f1d99bcfc0 2500w`})}),`\n`,_jsxs(Steps,{children:[_jsx(Step,{title:`Webhook 1 — Origination (required)`,children:_jsxs(_components.p,{children:[_jsx(_components.strong,{children:`Funcionalidade Reserva`}),`, on the situation that marks the sale / the send to commission payments (the same as the `,_jsx(_components.strong,{children:`Vendida`}),` field, Step 2.2). Makes Play2sell `,_jsx(_components.strong,{children:`originate the sale and issue the boleto`}),`.`]})}),_jsx(Step,{title:`Webhook 2 — Deed registration → releases the transfer (required)`,children:_jsxs(_components.p,{children:[_jsx(_components.strong,{children:`Funcionalidade Comissão`}),`, on the situation that indicates deed registration/release — e.g., “Escriturar” (the same as the `,_jsx(_components.strong,{children:`Escriturada (via comissão)`}),` field, Step 2.2). `,_jsx(_components.strong,{children:`Releases the transfer`}),` and pays the beneficiaries via `,_jsx(_components.strong,{children:`PIX`}),`.`]})}),_jsx(Step,{title:`Webhook 3 — Cancellation / Contract termination (recommended)`,children:_jsxs(_components.p,{children:[_jsx(_components.strong,{children:`Funcionalidade Comissão`}),`, on the cancellation situation — e.g., “Cancelada” (the same as the `,_jsx(_components.strong,{children:`Cancelada (via comissão)`}),` field, Step 2.2). `,_jsx(_components.strong,{children:`Cancels`}),` the unpaid boleto or `,_jsx(_components.strong,{children:`refunds`}),` the paid one, depending on the state.`]})})]}),`\n`,_jsx(Tip,{children:_jsx(_components.p,{children:`Link the webhooks to the integration user (“Integração”) — that way the changes made by the automation stay attributable in the CVCRM history.`})}),`\n`,_jsx(Note,{children:_jsxs(_components.p,{children:[_jsx(_components.strong,{children:`Variation by instance.`}),` If your CVCRM records deed registration or cancellation on the `,_jsx(_components.strong,{children:`reservation itself`}),` (and not on the commission), create webhooks 2 and 3 with `,_jsx(_components.strong,{children:`Funcionalidade Reserva`}),` and, in Step 2.2, use the `,_jsx(_components.strong,{children:`Escriturada`}),` and `,_jsx(_components.strong,{children:`Distrato`}),` fields instead of the “(via comissão)” ones. The behavior is the same.`]})}),`\n`,_jsx(Check,{children:_jsxs(_components.p,{children:[_jsx(_components.strong,{children:`Confirm the 3 webhooks are firing.`}),` In the webhook list, the `,_jsx(_components.strong,{children:`Transações`}),` (Transactions) column counts each send. If it stays at `,_jsx(_components.strong,{children:`0`}),` after moving a record to the trigger situation, review: the `,_jsx(_components.strong,{children:`Funcionalidade`}),`, the `,_jsx(_components.strong,{children:`situation`}),` (it must match Step 2.2), whether the webhook is `,_jsx(_components.strong,{children:`Ativo no painel`}),`, and whether the `,_jsx(_components.strong,{children:`Endereço`}),` is the exact URL from Step 3 (no spaces).`]})}),`\n`,_jsx(Heading,{level:`3`,id:`4-2-—-register-the-receipt-type-optional`,children:`4.2 — Register the receipt type (optional)`}),`\n`,_jsxs(_components.p,{children:[`Do this `,_jsx(_components.strong,{children:`only if`}),` you enabled the `,_jsx(_components.strong,{children:`Transfer receipt`}),` in Step 2.4. It’s a one-time setting that creates the `,_jsx(_components.strong,{children:`file type`}),` used to attach the receipt PDF to the commission.`]}),`\n`,_jsxs(_components.p,{children:[`In the CVCRM manager, go to `,_jsx(_components.strong,{children:`Configurações → Tipos de Arquivos de Pagamento Comissão`}),` (Settings → Commission Payment File Types), click `,_jsx(_components.strong,{children:`”+ Criar novo Tipo”`}),` (+ Create new Type), and fill in:`]}),`\n`,_jsxs(Table,{children:[_jsx(_components.thead,{children:_jsxs(_components.tr,{children:[_jsx(_components.th,{children:`Field`}),_jsx(_components.th,{children:`What to enter`})]})}),_jsxs(_components.tbody,{children:[_jsxs(_components.tr,{children:[_jsx(_components.td,{children:_jsx(_components.strong,{children:`Nome`})}),_jsxs(_components.td,{children:[`The type name (e.g., `,_jsx(_components.code,{children:`Comprovante_Play2sell`}),`). `,_jsx(_components.strong,{children:`Use exactly this name`}),` in the “Tipo do comprovante” field from Step 2.4.`]})]}),_jsxs(_components.tr,{children:[_jsx(_components.td,{children:_jsx(_components.strong,{children:`Ativo no painel`})}),_jsxs(_components.td,{children:[_jsx(_components.code,{children:`Ativo`}),` (Active).`]})]}),_jsxs(_components.tr,{children:[_jsx(_components.td,{children:_jsx(_components.strong,{children:`Tipo Pessoa`})}),_jsxs(_components.td,{children:[_jsx(_components.code,{children:`Física / Jurídica`}),` (Individual / Company).`]})]}),_jsxs(_components.tr,{children:[_jsx(_components.td,{children:_jsx(_components.strong,{children:`Obrigatório`})}),_jsxs(_components.td,{children:[_jsx(_components.code,{children:`Não`}),` (No) — Play2sell attaches the receipt automatically.`]})]})]})]}),`\n`,_jsx(Frame,{caption:`CVCRM → Tipos de Arquivos de Pagamento Comissão → Criar novo Tipo`,children:_jsx(OptimizedImage,{src:`https://mintcdn.com/play2sell/UX439KPh_mD83OMk/images/integrations/cvcrm/11-cvcrm-tipo-comprovante.png?fit=max\u0026auto=format\u0026n=UX439KPh_mD83OMk\u0026q=85\u0026s=ab2c54a028696a8a1fecd263241d4915`,alt:`Commission payment file type registration form in CVCRM`,\"data-og-width\":`1654`,width:`1654`,\"data-og-height\":`894`,height:`894`,\"data-path\":`images/integrations/cvcrm/11-cvcrm-tipo-comprovante.png`,\"data-optimize\":`true`,\"data-opv\":`3`,srcset:`https://mintcdn.com/play2sell/UX439KPh_mD83OMk/images/integrations/cvcrm/11-cvcrm-tipo-comprovante.png?w=280\u0026fit=max\u0026auto=format\u0026n=UX439KPh_mD83OMk\u0026q=85\u0026s=94d8dfa9f35e50718f6838e093070907 280w, https://mintcdn.com/play2sell/UX439KPh_mD83OMk/images/integrations/cvcrm/11-cvcrm-tipo-comprovante.png?w=560\u0026fit=max\u0026auto=format\u0026n=UX439KPh_mD83OMk\u0026q=85\u0026s=c12bbd28e54ef763ff8c9befa522315a 560w, https://mintcdn.com/play2sell/UX439KPh_mD83OMk/images/integrations/cvcrm/11-cvcrm-tipo-comprovante.png?w=840\u0026fit=max\u0026auto=format\u0026n=UX439KPh_mD83OMk\u0026q=85\u0026s=2a436d12b298e39958ef7eb16b29def7 840w, https://mintcdn.com/play2sell/UX439KPh_mD83OMk/images/integrations/cvcrm/11-cvcrm-tipo-comprovante.png?w=1100\u0026fit=max\u0026auto=format\u0026n=UX439KPh_mD83OMk\u0026q=85\u0026s=0eee60a6a6a2bbd34a640d06c37bb984 1100w, https://mintcdn.com/play2sell/UX439KPh_mD83OMk/images/integrations/cvcrm/11-cvcrm-tipo-comprovante.png?w=1650\u0026fit=max\u0026auto=format\u0026n=UX439KPh_mD83OMk\u0026q=85\u0026s=b6db93693cc5166e64850345b8e48bf3 1650w, https://mintcdn.com/play2sell/UX439KPh_mD83OMk/images/integrations/cvcrm/11-cvcrm-tipo-comprovante.png?w=2500\u0026fit=max\u0026auto=format\u0026n=UX439KPh_mD83OMk\u0026q=85\u0026s=7d5f4ede415bcb00960c033bbedce1bc 2500w`})}),`\n`,_jsx(Heading,{level:`3`,id:`4-3-—-ensure-“payment-method-=-boleto”`,children:`4.3 — Ensure “Payment method = Boleto”`}),`\n`,_jsxs(_components.p,{children:[`For the boleto issued by Play2sell to appear as the commission receivable (and settle correctly), the `,_jsx(_components.strong,{children:`commission payments in CVCRM`}),` must use the `,_jsx(_components.strong,{children:`“Boleto” payment method`}),`.`]}),`\n`,_jsxs(_components.p,{children:[`To check: in `,_jsx(_components.strong,{children:`Financeiro → Comissões`}),` (Finance → Commissions), open a commission and click the `,_jsx(_components.strong,{children:_jsx(_components.code,{children:`$`})}),` icon (Payments). In the `,_jsx(_components.strong,{children:`Pagamentos`}),` (Payments) section, each beneficiary installment has a `,_jsx(_components.strong,{children:`“Forma de pagamento”`}),` (Payment method) column — it must be set to `,_jsx(_components.strong,{children:`Boleto`}),`.`]}),`\n`,_jsx(Warning,{children:_jsxs(_components.p,{children:[`If the installment has another method (e.g., “Transferência bancária”/bank transfer), the boleto we issue `,_jsx(_components.strong,{children:`won’t match`}),` the commission. Adjust the method to `,_jsx(_components.strong,{children:`Boleto`}),` in your CVCRM’s commission rule/condition.`]})}),`\n`,_jsx(Frame,{caption:`Commission → Payments: each installment with Forma de pagamento = Boleto (situation “Programado” after issuance)`,children:_jsx(OptimizedImage,{src:`https://mintcdn.com/play2sell/UX439KPh_mD83OMk/images/integrations/cvcrm/12-cvcrm-forma-boleto.png?fit=max\u0026auto=format\u0026n=UX439KPh_mD83OMk\u0026q=85\u0026s=b10581fd9b164cfb1287d2709d0dde29`,alt:`Commission payments in CVCRM with Payment method equal to Boleto`,\"data-og-width\":`1650`,width:`1650`,\"data-og-height\":`1350`,height:`1350`,\"data-path\":`images/integrations/cvcrm/12-cvcrm-forma-boleto.png`,\"data-optimize\":`true`,\"data-opv\":`3`,srcset:`https://mintcdn.com/play2sell/UX439KPh_mD83OMk/images/integrations/cvcrm/12-cvcrm-forma-boleto.png?w=280\u0026fit=max\u0026auto=format\u0026n=UX439KPh_mD83OMk\u0026q=85\u0026s=bbf924a65bb7f403c6f4234192b881f6 280w, https://mintcdn.com/play2sell/UX439KPh_mD83OMk/images/integrations/cvcrm/12-cvcrm-forma-boleto.png?w=560\u0026fit=max\u0026auto=format\u0026n=UX439KPh_mD83OMk\u0026q=85\u0026s=c2b04ac1c95d9b6d25ad8a5af611d866 560w, https://mintcdn.com/play2sell/UX439KPh_mD83OMk/images/integrations/cvcrm/12-cvcrm-forma-boleto.png?w=840\u0026fit=max\u0026auto=format\u0026n=UX439KPh_mD83OMk\u0026q=85\u0026s=3339f729dd4c0dec26f2cab0e1b229a4 840w, https://mintcdn.com/play2sell/UX439KPh_mD83OMk/images/integrations/cvcrm/12-cvcrm-forma-boleto.png?w=1100\u0026fit=max\u0026auto=format\u0026n=UX439KPh_mD83OMk\u0026q=85\u0026s=bed1dd2d7daf34ffa846f3ec2ffa8071 1100w, https://mintcdn.com/play2sell/UX439KPh_mD83OMk/images/integrations/cvcrm/12-cvcrm-forma-boleto.png?w=1650\u0026fit=max\u0026auto=format\u0026n=UX439KPh_mD83OMk\u0026q=85\u0026s=7c1b22cc97e84625fb0812b0433078f8 1650w, https://mintcdn.com/play2sell/UX439KPh_mD83OMk/images/integrations/cvcrm/12-cvcrm-forma-boleto.png?w=2500\u0026fit=max\u0026auto=format\u0026n=UX439KPh_mD83OMk\u0026q=85\u0026s=001ff5138ecf77867f004aaf33c8138e 2500w`})}),`\n`,_jsx(Heading,{level:`3`,id:`4-4-—-choose-who-goes-into-the-boleto-“enviar-para-pagadoria”`,children:`4.4 — Choose who goes into the boleto (“Enviar para Pagadoria”)`}),`\n`,_jsxs(_components.p,{children:[`In the CVCRM commission rule, each commission recipient has the field `,_jsx(_components.strong,{children:`Enviar para Pagadoria`}),` (`,_jsx(_components.strong,{children:`Sim`}),` or `,_jsx(_components.strong,{children:`Não`}),`). It decides who Play2sell charges for and pays.`]}),`\n`,_jsxs(_components.p,{children:[`To check: in `,_jsx(_components.strong,{children:`Financeiro → Configuração de Comissões → Regras da comissão`}),`, open the recipient’s line with `,_jsx(_components.strong,{children:`Editar`}),` and look at the `,_jsx(_components.strong,{children:`Enviar para Pagadoria`}),` field.`]}),`\n`,_jsxs(Table,{children:[_jsx(_components.thead,{children:_jsxs(_components.tr,{children:[_jsx(_components.th,{children:`How the rule is set`}),_jsx(_components.th,{children:`What Play2sell does`})]})}),_jsxs(_components.tbody,{children:[_jsxs(_components.tr,{children:[_jsxs(_components.td,{children:[`At least one recipient set to `,_jsx(_components.strong,{children:`Sim`})]}),_jsxs(_components.td,{children:[`Originates the sale. The boleto for each due date is the `,_jsx(_components.strong,{children:`sum of the commissions set to Sim`}),`.`]})]}),_jsxs(_components.tr,{children:[_jsxs(_components.td,{children:[`Recipient set to `,_jsx(_components.strong,{children:`Não`})]}),_jsxs(_components.td,{children:[`Stays `,_jsx(_components.strong,{children:`out of the boleto`}),` and is `,_jsx(_components.strong,{children:`not paid`}),` by Play2sell at deed registration. You pay this recipient outside Play2sell.`]})]}),_jsxs(_components.tr,{children:[_jsxs(_components.td,{children:[_jsx(_components.strong,{children:`All`}),` set to `,_jsx(_components.strong,{children:`Não`})]}),_jsxs(_components.td,{children:[`No boleto is issued. The reservation shows as `,_jsx(_components.strong,{children:`Nada a cobrar`}),` (nothing to charge) in the panel — it is not an error.`]})]})]})]}),`\n`,_jsxs(_components.p,{children:[_jsx(_components.strong,{children:`Example.`}),` Total commission of R`,_jsxs(_components.span,{className:`katex`,children:[_jsx(_components.span,{className:`katex-mathml`,children:_jsx(_components.math,{xmlns:`http://www.w3.org/1998/Math/MathML`,children:_jsxs(_components.semantics,{children:[_jsxs(_components.mrow,{children:[_jsx(_components.mn,{children:`10`}),_jsx(_components.mo,{separator:`true`,children:`,`}),_jsx(_components.mn,{children:`000`}),_jsx(_components.mi,{children:`w`}),_jsx(_components.mi,{children:`i`}),_jsx(_components.mi,{children:`t`}),_jsx(_components.mi,{children:`h`}),_jsx(_components.mi,{children:`t`}),_jsx(_components.mi,{children:`h`}),_jsx(_components.mi,{children:`r`}),_jsx(_components.mi,{children:`e`}),_jsx(_components.mi,{children:`e`}),_jsx(_components.mi,{children:`r`}),_jsx(_components.mi,{children:`e`}),_jsx(_components.mi,{children:`c`}),_jsx(_components.mi,{children:`i`}),_jsx(_components.mi,{children:`p`}),_jsx(_components.mi,{children:`i`}),_jsx(_components.mi,{children:`e`}),_jsx(_components.mi,{children:`n`}),_jsx(_components.mi,{children:`t`}),_jsx(_components.mi,{children:`s`}),_jsx(_components.mo,{children:`:`}),_jsx(_components.mi,{children:`t`}),_jsx(_components.mi,{children:`h`}),_jsx(_components.mi,{children:`e`}),_jsx(_components.mi,{children:`f`}),_jsx(_components.mi,{children:`i`}),_jsx(_components.mi,{children:`r`}),_jsx(_components.mi,{children:`s`}),_jsx(_components.mi,{children:`t`}),_jsx(_components.mi,{children:`g`}),_jsx(_components.mi,{children:`e`}),_jsx(_components.mi,{children:`t`}),_jsx(_components.mi,{children:`s`}),_jsx(_components.mi,{children:`R`})]}),_jsx(_components.annotation,{encoding:`application/x-tex`,children:` 10,000 with three recipients: the first gets R`})]})})}),_jsxs(_components.span,{className:`katex-html`,\"aria-hidden\":`true`,children:[_jsxs(_components.span,{className:`base`,children:[_jsx(_components.span,{className:`strut`,style:{height:`0.8889em`,verticalAlign:`-0.1944em`}}),_jsx(_components.span,{className:`mord`,children:`10`}),_jsx(_components.span,{className:`mpunct`,children:`,`}),_jsx(_components.span,{className:`mspace`,style:{marginRight:`0.1667em`}}),_jsx(_components.span,{className:`mord`,children:`000`}),_jsx(_components.span,{className:`mord mathnormal`,style:{marginRight:`0.0269em`},children:`w`}),_jsx(_components.span,{className:`mord mathnormal`,children:`i`}),_jsx(_components.span,{className:`mord mathnormal`,children:`t`}),_jsx(_components.span,{className:`mord mathnormal`,children:`h`}),_jsx(_components.span,{className:`mord mathnormal`,children:`t`}),_jsx(_components.span,{className:`mord mathnormal`,children:`h`}),_jsx(_components.span,{className:`mord mathnormal`,style:{marginRight:`0.0278em`},children:`r`}),_jsx(_components.span,{className:`mord mathnormal`,style:{marginRight:`0.0278em`},children:`eer`}),_jsx(_components.span,{className:`mord mathnormal`,children:`ec`}),_jsx(_components.span,{className:`mord mathnormal`,children:`i`}),_jsx(_components.span,{className:`mord mathnormal`,children:`p`}),_jsx(_components.span,{className:`mord mathnormal`,children:`i`}),_jsx(_components.span,{className:`mord mathnormal`,children:`e`}),_jsx(_components.span,{className:`mord mathnormal`,children:`n`}),_jsx(_components.span,{className:`mord mathnormal`,children:`t`}),_jsx(_components.span,{className:`mord mathnormal`,children:`s`}),_jsx(_components.span,{className:`mspace`,style:{marginRight:`0.2778em`}}),_jsx(_components.span,{className:`mrel`,children:`:`}),_jsx(_components.span,{className:`mspace`,style:{marginRight:`0.2778em`}})]}),_jsxs(_components.span,{className:`base`,children:[_jsx(_components.span,{className:`strut`,style:{height:`0.8889em`,verticalAlign:`-0.1944em`}}),_jsx(_components.span,{className:`mord mathnormal`,children:`t`}),_jsx(_components.span,{className:`mord mathnormal`,children:`h`}),_jsx(_components.span,{className:`mord mathnormal`,children:`e`}),_jsx(_components.span,{className:`mord mathnormal`,style:{marginRight:`0.1076em`},children:`f`}),_jsx(_components.span,{className:`mord mathnormal`,children:`i`}),_jsx(_components.span,{className:`mord mathnormal`,style:{marginRight:`0.0278em`},children:`r`}),_jsx(_components.span,{className:`mord mathnormal`,children:`s`}),_jsx(_components.span,{className:`mord mathnormal`,children:`t`}),_jsx(_components.span,{className:`mord mathnormal`,style:{marginRight:`0.0359em`},children:`g`}),_jsx(_components.span,{className:`mord mathnormal`,children:`e`}),_jsx(_components.span,{className:`mord mathnormal`,children:`t`}),_jsx(_components.span,{className:`mord mathnormal`,children:`s`}),_jsx(_components.span,{className:`mord mathnormal`,style:{marginRight:`0.0077em`},children:`R`})]})]})]}),` 5,000 (`,_jsx(_components.strong,{children:`Sim`}),`), the second R`,_jsxs(_components.span,{className:`katex`,children:[_jsx(_components.span,{className:`katex-mathml`,children:_jsx(_components.math,{xmlns:`http://www.w3.org/1998/Math/MathML`,children:_jsxs(_components.semantics,{children:[_jsxs(_components.mrow,{children:[_jsx(_components.mn,{children:`2`}),_jsx(_components.mo,{separator:`true`,children:`,`}),_jsx(_components.mn,{children:`000`}),_jsx(_components.mo,{stretchy:`false`,children:`(`}),_jsx(_components.mo,{children:`∗`}),_jsx(_components.mo,{children:`∗`}),_jsx(_components.mi,{children:`N`}),_jsxs(_components.mover,{accent:`true`,children:[_jsx(_components.mi,{children:`a`}),_jsx(_components.mo,{children:`~`})]}),_jsx(_components.mi,{children:`o`}),_jsx(_components.mo,{children:`∗`}),_jsx(_components.mo,{children:`∗`}),_jsx(_components.mo,{stretchy:`false`,children:`)`}),_jsx(_components.mi,{children:`a`}),_jsx(_components.mi,{children:`n`}),_jsx(_components.mi,{children:`d`}),_jsx(_components.mi,{children:`t`}),_jsx(_components.mi,{children:`h`}),_jsx(_components.mi,{children:`e`}),_jsx(_components.mi,{children:`t`}),_jsx(_components.mi,{children:`h`}),_jsx(_components.mi,{children:`i`}),_jsx(_components.mi,{children:`r`}),_jsx(_components.mi,{children:`d`}),_jsx(_components.mi,{children:`R`})]}),_jsx(_components.annotation,{encoding:`application/x-tex`,children:` 2,000 (**Não**) and the third R`})]})})}),_jsxs(_components.span,{className:`katex-html`,\"aria-hidden\":`true`,children:[_jsxs(_components.span,{className:`base`,children:[_jsx(_components.span,{className:`strut`,style:{height:`1em`,verticalAlign:`-0.25em`}}),_jsx(_components.span,{className:`mord`,children:`2`}),_jsx(_components.span,{className:`mpunct`,children:`,`}),_jsx(_components.span,{className:`mspace`,style:{marginRight:`0.1667em`}}),_jsx(_components.span,{className:`mord`,children:`000`}),_jsx(_components.span,{className:`mopen`,children:`(`}),_jsx(_components.span,{className:`mord`,children:`∗`}),_jsx(_components.span,{className:`mspace`,style:{marginRight:`0.2222em`}}),_jsx(_components.span,{className:`mbin`,children:`∗`}),_jsx(_components.span,{className:`mspace`,style:{marginRight:`0.2222em`}})]}),_jsxs(_components.span,{className:`base`,children:[_jsx(_components.span,{className:`strut`,style:{height:`0.6833em`}}),_jsx(_components.span,{className:`mord mathnormal`,style:{marginRight:`0.109em`},children:`N`}),_jsx(_components.span,{className:`mord accent`,children:_jsx(_components.span,{className:`vlist-t`,children:_jsx(_components.span,{className:`vlist-r`,children:_jsxs(_components.span,{className:`vlist`,style:{height:`0.6679em`},children:[_jsxs(_components.span,{style:{top:`-3em`},children:[_jsx(_components.span,{className:`pstrut`,style:{height:`3em`}}),_jsx(_components.span,{className:`mord mathnormal`,children:`a`})]}),_jsxs(_components.span,{style:{top:`-3.35em`},children:[_jsx(_components.span,{className:`pstrut`,style:{height:`3em`}}),_jsx(_components.span,{className:`accent-body`,style:{left:`-0.25em`},children:_jsx(_components.span,{className:`mord`,children:`~`})})]})]})})})}),_jsx(_components.span,{className:`mord mathnormal`,children:`o`}),_jsx(_components.span,{className:`mspace`,style:{marginRight:`0.2222em`}}),_jsx(_components.span,{className:`mbin`,children:`∗`}),_jsx(_components.span,{className:`mspace`,style:{marginRight:`0.2222em`}})]}),_jsxs(_components.span,{className:`base`,children:[_jsx(_components.span,{className:`strut`,style:{height:`1em`,verticalAlign:`-0.25em`}}),_jsx(_components.span,{className:`mord`,children:`∗`}),_jsx(_components.span,{className:`mclose`,children:`)`}),_jsx(_components.span,{className:`mord mathnormal`,children:`an`}),_jsx(_components.span,{className:`mord mathnormal`,children:`d`}),_jsx(_components.span,{className:`mord mathnormal`,children:`t`}),_jsx(_components.span,{className:`mord mathnormal`,children:`h`}),_jsx(_components.span,{className:`mord mathnormal`,children:`e`}),_jsx(_components.span,{className:`mord mathnormal`,children:`t`}),_jsx(_components.span,{className:`mord mathnormal`,children:`hi`}),_jsx(_components.span,{className:`mord mathnormal`,style:{marginRight:`0.0278em`},children:`r`}),_jsx(_components.span,{className:`mord mathnormal`,children:`d`}),_jsx(_components.span,{className:`mord mathnormal`,style:{marginRight:`0.0077em`},children:`R`})]})]})]}),` 3,000 (`,_jsx(_components.strong,{children:`Sim`}),`). The buyer’s boleto is issued for `,_jsx(_components.strong,{children:`R$ 8,000`}),`, and at deed registration only the first and the third are paid.`]}),`\n`,_jsx(Warning,{children:_jsxs(_components.p,{children:[_jsx(_components.strong,{children:`At most 6 recipients set to “Sim” per due date.`}),` The rule may have more recipients than that, as long as no more than 6 are set to `,_jsx(_components.strong,{children:`Sim`}),` on each due date.`]})}),`\n`,_jsx(Note,{children:_jsxs(_components.p,{children:[_jsx(_components.strong,{children:`Changed the option after the reservation went through?`}),` Editing “Enviar para Pagadoria” in CVCRM `,_jsx(_components.strong,{children:`does not notify`}),` Play2sell. After adjusting it, use `,_jsx(_components.strong,{children:`Gerar boleto`}),` in the panel — see `,_jsx(_components.strong,{children:`How to reprocess a reservation`}),` under Troubleshooting.`]})}),`\n`,_jsx(Tip,{children:_jsxs(_components.p,{children:[`When the same recipient appears on `,_jsx(_components.strong,{children:`more than one line`}),` of the rule (for example, commission and bonus), keep `,_jsx(_components.strong,{children:`all of their lines on the same option`}),`. With one line on Sim and another on Não, Play2sell cannot tell which installment to charge and `,_jsx(_components.strong,{children:`does not issue the boleto`}),`.`]})}),`\n`,_jsx(Heading,{level:`2`,id:`step-5-—-test-and-validate`,children:`Step 5 — Test and validate`}),`\n`,_jsx(_components.p,{children:`Before operating for real, run an end-to-end test with low amounts.`}),`\n`,_jsxs(Steps,{children:[_jsx(Step,{title:`Create a clean test reservation`,children:_jsxs(_components.p,{children:[`With a buyer (CPF filled in), a valid amount, and `,_jsx(_components.strong,{children:`commissions summing to 100%`}),` for one broker.`]})}),_jsx(Step,{title:`Move it to the sale situation`,children:_jsxs(_components.p,{children:[`This triggers the origination webhook.\n`,_jsxs(Check,{children:[`The sale appears in the Play2sell panel and the `,_jsx(_components.strong,{children:`boleto is attached to the commission`}),` in CVCRM (situation “Programado”).`]})]})}),_jsx(Step,{title:`Pay the boleto via Pix`,children:_jsxs(_components.p,{children:[`Use the Pix copy-and-paste code (it clears instantly).\n`,_jsxs(Check,{children:[`The commission changes to `,_jsx(_components.strong,{children:`“Pago”`}),` in CVCRM.`]})]})}),_jsx(Step,{title:`Register the commission deed`,children:_jsxs(_components.p,{children:[`Move the commission to the `,_jsx(_components.strong,{children:`Escriturar`}),` situation.\n`,_jsxs(Check,{children:[`The PIX transfer is paid to the beneficiary and the `,_jsx(_components.strong,{children:`receipt`}),` is attached to the commission (if configured in Step 2.4).`]})]})})]}),`\n`,_jsx(Heading,{level:`2`,id:`next-steps`,children:`Next steps`}),`\n`,_jsx(_components.p,{children:`Once validated, the integration runs on its own. Day to day:`}),`\n`,_jsxs(_components.ul,{children:[`\n`,_jsxs(_components.li,{children:[_jsx(_components.strong,{children:`Each sale`}),` that enters the commission-payments situation generates the boleto and reflects it on the CVCRM commission, with no manual action.`]}),`\n`,_jsxs(_components.li,{children:[_jsx(_components.strong,{children:`Track`}),` commission status in `,_jsx(_components.strong,{children:`Financeiro → Comissões`}),` (CVCRM) and sales in the `,_jsx(_components.strong,{children:`Play2sell panel`}),`.`]}),`\n`,_jsxs(_components.li,{children:[_jsx(_components.strong,{children:`To adjust`}),` the situation mapping or the credentials later, go back to `,_jsx(_components.strong,{children:`Integrações → Conectores → CVCRM → Editar configuração`}),` (Edit configuration).`]}),`\n`]}),`\n`,_jsx(Heading,{level:`2`,id:`frequently-asked-questions`,children:`Frequently asked questions`}),`\n`,_jsxs(AccordionGroup,{children:[_jsx(Accordion,{title:`Do I need a developer to set this up?`,id:`do-i-need-a-developer-to-set-this-up`,children:_jsx(_components.p,{children:`No. The entire setup is done through screens, in the CVCRM manager and the Play2sell panel. You only need administrative access to both systems. No code is required.`})}),_jsx(Accordion,{title:`Which webhooks does CVCRM need to have?`,id:`which-webhooks-does-cvcrm-need-to-have`,children:_jsxs(_components.p,{children:[`Three, all pointing to the `,_jsx(_components.strong,{children:`same URL`}),`: (1) `,_jsx(_components.strong,{children:`Reserva`}),` on the sale situation → origination; (2) `,_jsx(_components.strong,{children:`Comissão`}),` on the “Escriturar” situation → releases the transfer; (3) `,_jsx(_components.strong,{children:`Comissão`}),` on the cancellation situation → refund.`]})}),_jsx(Accordion,{title:`How is the commission amount calculated?`,id:`how-is-the-commission-amount-calculated`,children:_jsxs(_components.p,{children:[`CVCRM shows the `,_jsx(_components.strong,{children:`gross`}),` commission. Play2sell applies the `,_jsx(_components.strong,{children:`service fee`}),` (typically 1–3%) and the beneficiary receives the `,_jsx(_components.strong,{children:`net`}),` amount via PIX. The calculation uses the `,_jsx(_components.strong,{children:`commission amount`}),`, not the sale amount.`]})}),_jsx(Accordion,{title:`Does the integration work with a commission smaller than 100% of the sale?`,id:`does-the-integration-work-with-a-commission-smaller-than-100-of-the-sale`,children:_jsxs(_components.p,{children:[`Yes. The boleto and the split are calculated on the `,_jsx(_components.strong,{children:`commission amount`}),`, so any percentage works.`]})}),_jsx(Accordion,{title:`How quickly does the broker get paid?`,id:`how-quickly-does-the-broker-get-paid`,children:_jsxs(_components.p,{children:[`After the commission’s deed is `,_jsx(_components.strong,{children:`registered`}),` in CVCRM, the `,_jsx(_components.strong,{children:`PIX`}),` transfer is processed within seconds and lands in the beneficiary’s account.`]})}),_jsx(Accordion,{title:`Is the transfer receipt mandatory?`,id:`is-the-transfer-receipt-mandatory`,children:_jsxs(_components.p,{children:[`No, it’s `,_jsx(_components.strong,{children:`optional`}),`. Without it, the transfer is paid normally; only the PDF attachment on the CVCRM commission doesn’t happen.`]})})]}),`\n`,_jsx(Heading,{level:`2`,id:`troubleshooting`,children:`Troubleshooting`}),`\n`,_jsxs(AccordionGroup,{children:[_jsx(Accordion,{title:`No events reach Play2sell`,id:`no-events-reach-play2sell`,children:_jsxs(_components.p,{children:[`Check in CVCRM: is the webhook `,_jsx(_components.strong,{children:`Ativo`}),` (active)? Do the `,_jsx(_components.strong,{children:`Funcionalidade`}),` (Reserva/Comissão) and the trigger `,_jsx(_components.strong,{children:`situation`}),` match what you mapped in the panel? Is the `,_jsx(_components.strong,{children:`Endereço`}),` the exact URL copied in Step 3 (no spaces/line breaks)?`]})}),_jsx(Accordion,{title:`The boleto didn't appear on the commission`,id:`the-boleto-didnt-appear-on-the-commission`,children:_jsxs(_components.p,{children:[`Confirm that the commission’s `,_jsx(_components.strong,{children:`payment method`}),` is `,_jsx(_components.strong,{children:`Boleto`}),` (Step 4.3) and that the exit situation `,_jsx(_components.strong,{children:`“Comissão com boleto”`}),` is filled in (e.g., `,_jsx(_components.code,{children:`Programado`}),`). After adjusting the configuration, use `,_jsx(_components.strong,{children:`Gerar boleto`}),` in the panel (see `,_jsx(_components.strong,{children:`How to reprocess a reservation`}),`, below).`]})}),_jsx(Accordion,{title:`The reservation shows \"Nada a cobrar\"`,id:`the-reservation-shows-nada-a-cobrar`,children:_jsxs(_components.p,{children:[`Every recipient in the rule was set to `,_jsx(_components.strong,{children:`Enviar para Pagadoria = Não`}),` when the reservation arrived, so there was nothing to charge. If it should have been charged, set the right recipients to `,_jsx(_components.strong,{children:`Sim`}),` (Step 4.4) and use `,_jsx(_components.strong,{children:`Gerar boleto`}),` in the panel.`]})}),_jsxs(Accordion,{title:`How to reprocess a reservation`,id:`how-to-reprocess-a-reservation`,children:[_jsxs(_components.p,{children:[`In the Play2sell panel, go to `,_jsx(_components.strong,{children:`Integrações → Geral`}),`, find the `,_jsx(_components.strong,{children:`Integração CRM/ERP`}),` card and open `,_jsx(_components.strong,{children:`Eventos recentes`}),`. `,_jsx(_components.strong,{children:`Reservation`}),` rows with status `,_jsx(_components.strong,{children:`Falha`}),` or `,_jsx(_components.strong,{children:`Nada a cobrar`}),` show the action `,_jsx(_components.strong,{children:`Gerar boleto`}),`.`]}),_jsxs(_components.p,{children:[`When you confirm, Play2sell reads the reservation in CVCRM `,_jsx(_components.strong,{children:`as it is now`}),` and issues the boleto with the commissions set to `,_jsx(_components.strong,{children:`Sim`}),` — even if the reservation has already left the situation that generates the boleto. If the reservation is in a `,_jsx(_components.strong,{children:`cancellation`}),` situation, the cancellation prevails. The action is shown to users allowed to `,_jsx(_components.strong,{children:`manage payments`}),`.`]})]}),_jsx(Accordion,{title:`A beneficiary wasn't found / the transfer didn't go out`,id:`a-beneficiary-wasnt-found-the-transfer-didnt-go-out`,children:_jsxs(_components.p,{children:[`Identity is by `,_jsx(_components.strong,{children:`CPF/CNPJ`}),`, never by email. Make sure the beneficiary’s document is filled in and correct in CVCRM.`]})}),_jsx(Accordion,{title:`The paid status didn't reflect immediately`,id:`the-paid-status-didnt-reflect-immediately`,children:_jsx(_components.p,{children:`Payment confirmations and write-backs can take a few moments. If it persists, contact support.`})})]}),`\n`,_jsx(Heading,{level:`2`,id:`reference`,children:`Reference`}),`\n`,_jsx(Heading,{level:`3`,id:`end-to-end-lifecycle`,children:`End-to-end lifecycle`}),`\n`,_jsxs(Table,{children:[_jsx(_components.thead,{children:_jsxs(_components.tr,{children:[_jsx(_components.th,{children:`Stage`}),_jsx(_components.th,{children:`Event in CVCRM`}),_jsx(_components.th,{children:`Play2sell action`}),_jsx(_components.th,{children:`What you see`})]})}),_jsxs(_components.tbody,{children:[_jsxs(_components.tr,{children:[_jsx(_components.td,{children:_jsx(_components.strong,{children:`1. Origination`})}),_jsx(_components.td,{children:`Reservation → sale situation`}),_jsxs(_components.td,{children:[`Creates the sale + split and issues the `,_jsx(_components.strong,{children:`boleto (with Pix)`})]}),_jsx(_components.td,{children:`Sale in the panel; boleto generated`})]}),_jsxs(_components.tr,{children:[_jsx(_components.td,{children:_jsx(_components.strong,{children:`2. Boleto on the commission`})}),_jsx(_components.td,{children:`— (write-back)`}),_jsx(_components.td,{children:`Attaches the boleto to the commission`}),_jsxs(_components.td,{children:[`Commission becomes `,_jsx(_components.strong,{children:`Programado`}),`; Boleto/Commission-payments ID columns filled in`]})]}),_jsxs(_components.tr,{children:[_jsx(_components.td,{children:_jsx(_components.strong,{children:`3. Payment / settlement`})}),_jsx(_components.td,{children:`Buyer pays the boleto`}),_jsx(_components.td,{children:`Confirms the payment and reports it to CVCRM`}),_jsxs(_components.td,{children:[`Commission becomes `,_jsx(_components.strong,{children:`Pago`})]})]}),_jsxs(_components.tr,{children:[_jsx(_components.td,{children:_jsx(_components.strong,{children:`4. Deed registration`})}),_jsxs(_components.td,{children:[`Commission → `,_jsx(_components.strong,{children:`Escriturar`}),` situation`]}),_jsx(_components.td,{children:`Releases the transfer`}),_jsx(_components.td,{children:`Protocol released`})]}),_jsxs(_components.tr,{children:[_jsx(_components.td,{children:_jsx(_components.strong,{children:`5. Transfer`})}),_jsx(_components.td,{children:`—`}),_jsxs(_components.td,{children:[`Pays the beneficiary via `,_jsx(_components.strong,{children:`PIX`})]}),_jsx(_components.td,{children:`Transfer completed (net)`})]}),_jsxs(_components.tr,{children:[_jsx(_components.td,{children:_jsx(_components.strong,{children:`6. Receipt`})}),_jsx(_components.td,{children:`— (write-back)`}),_jsx(_components.td,{children:`Attaches the receipt to the commission`}),_jsx(_components.td,{children:`PDF in “Documentos do pagamento da Comissão”`})]}),_jsxs(_components.tr,{children:[_jsx(_components.td,{children:_jsx(_components.strong,{children:`Contract termination`})}),_jsx(_components.td,{children:`Reservation/Commission → cancellation`}),_jsx(_components.td,{children:`Refunds depending on the state`}),_jsx(_components.td,{children:`Operation refunded`})]})]})]}),`\n`,_jsx(Heading,{level:`3`,id:`error-contract`,children:`Error contract`}),`\n`,_jsxs(_components.p,{children:[`Error responses follow the `,_jsx(_components.code,{children:`{ code, message, hint? }`}),` format:`]}),`\n`,_jsxs(_components.ul,{children:[`\n`,_jsxs(_components.li,{children:[_jsx(_components.strong,{children:`4xx — rejection:`}),` something is incorrect (e.g., an unmapped situation). `,_jsx(_components.strong,{children:`Fix it and try again.`})]}),`\n`,_jsxs(_components.li,{children:[_jsx(_components.strong,{children:`5xx — transient error:`}),` a temporary failure. It is `,_jsx(_components.strong,{children:`reprocessed automatically`}),`.`]}),`\n`]}),`\n`,_jsx(Heading,{level:`3`,id:`technical-appendix`,children:`Technical appendix`}),`\n`,_jsx(Note,{children:_jsx(_components.p,{children:`This section is for technical teams. The setup above requires nothing from here.`})}),`\n`,_jsx(_components.p,{children:_jsx(_components.strong,{children:`CVCRM API families`})}),`\n`,_jsxs(Table,{children:[_jsx(_components.thead,{children:_jsxs(_components.tr,{children:[_jsx(_components.th,{children:`Family`}),_jsx(_components.th,{children:`Use`}),_jsx(_components.th,{children:`Note`})]})}),_jsxs(_components.tbody,{children:[_jsxs(_components.tr,{children:[_jsxs(_components.td,{children:[_jsx(_components.strong,{children:`v1`}),` (`,_jsx(_components.code,{children:`/api/v1/\u003cmodule>/*`}),`)`]}),_jsx(_components.td,{children:`Current — used by the integration`}),_jsxs(_components.td,{children:[`Auth via `,_jsx(_components.code,{children:`email`}),` + `,_jsx(_components.code,{children:`token`}),` headers; 200 req/min`]})]}),_jsxs(_components.tr,{children:[_jsxs(_components.td,{children:[_jsx(_components.strong,{children:`CVIO`}),` (`,_jsx(_components.code,{children:`/api/cvio/*`}),`)`]}),_jsx(_components.td,{children:`Legacy`}),_jsxs(_components.td,{children:[_jsx(_components.strong,{children:`Being deprecated`}),` — CVCRM is standardizing on v1`]})]}),_jsxs(_components.tr,{children:[_jsxs(_components.td,{children:[_jsx(_components.strong,{children:`CVDW`}),` (`,_jsx(_components.code,{children:`/api/v1/cvdw/*`}),`)`]}),_jsx(_components.td,{children:`BI / data warehouse`}),_jsxs(_components.td,{children:[_jsx(_components.strong,{children:`Separately paid contract`}),`; 20 req/min; returns 403 if not contracted`]})]})]})]}),`\n`,_jsx(_components.p,{children:_jsx(_components.strong,{children:`Synchronization and idempotency`})}),`\n`,_jsxs(_components.ul,{children:[`\n`,_jsxs(_components.li,{children:[_jsx(_components.strong,{children:`Thin webhook → pull-back:`}),` the webhook carries only an id; Play2sell fetches the full record via an authenticated `,_jsx(_components.code,{children:`GET`}),` before acting.`]}),`\n`,_jsxs(_components.li,{children:[_jsx(_components.strong,{children:`Idempotency:`}),` each contract maps to a stable key derived from the reservation id (`,_jsx(_components.code,{children:`cvcrm:{idreserva}`}),`); redelivery never duplicates the sale.`]}),`\n`,_jsxs(_components.li,{children:[_jsx(_components.strong,{children:`Ordering:`}),` if deed registration arrives before origination completes, it is deferred and reprocessed.`]}),`\n`]}),`\n`,_jsx(_components.p,{children:_jsx(_components.strong,{children:`Gotchas`})}),`\n`,_jsxs(_components.ul,{children:[`\n`,_jsxs(_components.li,{children:[`CVCRM may return `,_jsxs(_components.strong,{children:[`HTTP 200 with `,_jsx(_components.code,{children:`codigo:404`}),` in the body`]}),` for non-existent routes — always check the `,_jsx(_components.code,{children:`codigo`}),` field, not just the HTTP status.`]}),`\n`,_jsxs(_components.li,{children:[`Date filters on some endpoints are `,_jsx(_components.strong,{children:`ignored`}),` — window on the client side.`]}),`\n`,_jsxs(_components.li,{children:[`Dates in the installments GET use `,_jsx(_components.strong,{children:`DD/MM/YYYY`}),`.`]}),`\n`,_jsxs(_components.li,{children:[`There are `,_jsx(_components.strong,{children:`two distinct situation workflows`}),` — the `,_jsx(_components.strong,{children:`commission`}),` one and the `,_jsx(_components.strong,{children:`commission payment`}),` one — with ids that can collide. That’s why the situation write-back uses the `,_jsx(_components.strong,{children:`name`}),` (“Programado”/“Pago”), not the id.`]}),`\n`]}),`\n`,_jsx(Heading,{level:`2`,id:`support`,children:`Support`}),`\n`,_jsx(Tip,{children:_jsxs(_components.p,{children:[`Need help mapping the situations in your instance? Contact support at `,_jsx(_components.strong,{children:_jsx(_components.a,{href:`mailto:suporte@play2sell.com`,children:`suporte@play2sell.com`})}),` with your `,_jsx(_components.strong,{children:`domain`}),` and the list of situations you use for sale / deed registration / contract termination.`]})})]})}function MDXContent(props={}){const{wrapper:MDXLayout}={..._provideComponents(),...props.components};return MDXLayout?_jsx(MDXLayout,{...props,children:_jsx(_createMdxContent,{...props})}):_createMdxContent(props)}return{default:MDXContent};function _missingMdxReference(id,component){throw new Error(`Expected `+(component?`component`:`object`)+\" `\"+id+\"` to be defined: you likely forgot to import, pass, or provide it.\")}","frontmatter":{},"scope":{"config":{},"pageMetadata":{"title":"CVCRM Integration — Commission Payments","description":"How to connect your CVCRM to Play2sell PAY and pay commissions automatically — credentials, webhooks, payment method, receipt, lifecycle, testing, FAQ, and troubleshooting. Screen-by-screen setup, no coding.","icon":"building","href":"/api/integrations/cvcrm"}}},"mdxSourceWithNoJs":null},"mdxExtracts":{"tableOfContents":[{"title":"What you’ll set up","slug":"what-you’ll-set-up","depth":2,"children":[]},{"title":"How does the integration work?","slug":"how-does-the-integration-work","depth":2,"children":[]},{"title":"Step 1 — Get the credentials in CVCRM (email + token)","slug":"step-1-—-get-the-credentials-in-cvcrm-email-+-token","depth":2,"children":[]},{"title":"Step 2 — Connect in the Play2sell panel","slug":"step-2-—-connect-in-the-play2sell-panel","depth":2,"children":[{"title":"2.1 — Credentials","slug":"2-1-—-credentials","depth":3,"children":[]},{"title":"2.2 — Situation mapping","slug":"2-2-—-situation-mapping","depth":3,"children":[]},{"title":"2.3 — Exit situation (write-back)","slug":"2-3-—-exit-situation-write-back","depth":3,"children":[]},{"title":"2.4 — Transfer receipt (optional)","slug":"2-4-—-transfer-receipt-optional","depth":3,"children":[]},{"title":"2.5 — Role mapping (optional)","slug":"2-5-—-role-mapping-optional","depth":3,"children":[]}]},{"title":"Step 3 — Copy the webhook URL","slug":"step-3-—-copy-the-webhook-url","depth":2,"children":[]},{"title":"Step 4 — Configure CVCRM","slug":"step-4-—-configure-cvcrm","depth":2,"children":[{"title":"4.1 — Create the 3 webhooks","slug":"4-1-—-create-the-3-webhooks","depth":3,"children":[]},{"title":"4.2 — Register the receipt type (optional)","slug":"4-2-—-register-the-receipt-type-optional","depth":3,"children":[]},{"title":"4.3 — Ensure “Payment method = Boleto”","slug":"4-3-—-ensure-“payment-method-=-boleto”","depth":3,"children":[]},{"title":"4.4 — Choose who goes into the boleto (“Enviar para Pagadoria”)","slug":"4-4-—-choose-who-goes-into-the-boleto-“enviar-para-pagadoria”","depth":3,"children":[]}]},{"title":"Step 5 — Test and validate","slug":"step-5-—-test-and-validate","depth":2,"children":[]},{"title":"Next steps","slug":"next-steps","depth":2,"children":[]},{"title":"Frequently asked questions","slug":"frequently-asked-questions","depth":2,"children":[]},{"title":"Troubleshooting","slug":"troubleshooting","depth":2,"children":[]},{"title":"Reference","slug":"reference","depth":2,"children":[{"title":"End-to-end lifecycle","slug":"end-to-end-lifecycle","depth":3,"children":[]},{"title":"Error contract","slug":"error-contract","depth":3,"children":[]},{"title":"Technical appendix","slug":"technical-appendix","depth":3,"children":[]}]},{"title":"Support","slug":"support","depth":2,"children":[]}],"codeExamples":{}},"jsLinks":[],"subdomain":"play2sell","siteName":"SalesOS","title":"CVCRM Integration — Commission Payments - SalesOS","navMaps":{"firstHrefInVersion":{},"firstHrefInLanguage":{"en":{"href":"/api/integrations/cvcrm","matchLevel":0},"pt":{"href":"/pt/api/integrations/cvcrm","matchLevel":1},"es":{"href":"/es/api/integrations/cvcrm","matchLevel":1}}},"lastModified":"2026-10-05T14:00:50.818Z","originalFileLocation":"api/integrations/cvcrm.mdx","locale":"en"},"headHtml":"\u003cmeta data-mint-head name=\"description\" content=\"How to connect your CVCRM to Play2sell PAY and pay commissions automatically — credentials, webhooks, payment method, receipt, lifecycle, testing, FAQ, and troubleshooting. Screen-by-screen setup, no coding.\">\u003cmeta data-mint-head name=\"application-name\" content=\"SalesOS\">\u003cmeta data-mint-head name=\"generator\" content=\"Mintlify\">\u003clink data-mint-head rel=\"icon\" type=\"image/png\" sizes=\"192x192\" href=\"/mintlify-assets/_mintlify/favicons/play2sell/XDx17pbFw45Iann7/_generated/favicon/android-chrome-192x192.png\" media=\"(prefers-color-scheme: light)\">\u003clink data-mint-head rel=\"apple-touch-icon\" type=\"image/png\" sizes=\"180x180\" href=\"/mintlify-assets/_mintlify/favicons/play2sell/XDx17pbFw45Iann7/_generated/favicon/apple-touch-icon.png\">\u003clink data-mint-head rel=\"icon\" type=\"image/png\" sizes=\"16x16\" href=\"/mintlify-assets/_mintlify/favicons/play2sell/XDx17pbFw45Iann7/_generated/favicon/favicon-16x16.png\" media=\"(prefers-color-scheme: light)\">\u003clink data-mint-head rel=\"icon\" type=\"image/png\" sizes=\"32x32\" href=\"/mintlify-assets/_mintlify/favicons/play2sell/XDx17pbFw45Iann7/_generated/favicon/favicon-32x32.png\" media=\"(prefers-color-scheme: light)\">\u003clink data-mint-head rel=\"shortcut icon\" type=\"image/x-icon\" href=\"/mintlify-assets/_mintlify/favicons/play2sell/XDx17pbFw45Iann7/_generated/favicon/favicon.ico\" media=\"(prefers-color-scheme: light)\">\u003clink data-mint-head rel=\"icon\" type=\"image/png\" sizes=\"192x192\" href=\"/mintlify-assets/_mintlify/favicons/play2sell/XDx17pbFw45Iann7/_generated/favicon-dark/android-chrome-192x192.png\" media=\"(prefers-color-scheme: dark)\">\u003clink data-mint-head rel=\"icon\" type=\"image/png\" sizes=\"16x16\" href=\"/mintlify-assets/_mintlify/favicons/play2sell/XDx17pbFw45Iann7/_generated/favicon-dark/favicon-16x16.png\" media=\"(prefers-color-scheme: dark)\">\u003clink data-mint-head rel=\"icon\" type=\"image/png\" sizes=\"32x32\" href=\"/mintlify-assets/_mintlify/favicons/play2sell/XDx17pbFw45Iann7/_generated/favicon-dark/favicon-32x32.png\" media=\"(prefers-color-scheme: dark)\">\u003clink data-mint-head rel=\"shortcut icon\" type=\"image/x-icon\" href=\"/mintlify-assets/_mintlify/favicons/play2sell/XDx17pbFw45Iann7/_generated/favicon-dark/favicon.ico\" media=\"(prefers-color-scheme: dark)\">\u003cmeta data-mint-head property=\"og:title\" content=\"CVCRM Integration — Commission Payments - SalesOS\">\u003cmeta data-mint-head property=\"og:description\" content=\"How to connect your CVCRM to Play2sell PAY and pay commissions automatically — credentials, webhooks, payment method, receipt, lifecycle, testing, FAQ, and troubleshooting. Screen-by-screen setup, no coding.\">\u003cmeta data-mint-head property=\"og:site_name\" content=\"SalesOS\">\u003cmeta data-mint-head property=\"og:url\" content=\"https://docs.play2sell.com/api/integrations/cvcrm\">\u003cmeta data-mint-head property=\"og:type\" content=\"website\">\u003cmeta data-mint-head name=\"twitter:card\" content=\"summary_large_image\">\u003cmeta data-mint-head name=\"twitter:title\" content=\"CVCRM Integration — Commission Payments - SalesOS\">\u003cmeta data-mint-head name=\"twitter:description\" content=\"How to connect your CVCRM to Play2sell PAY and pay commissions automatically — credentials, webhooks, payment method, receipt, lifecycle, testing, FAQ, and troubleshooting. Screen-by-screen setup, no coding.\">\u003cmeta data-mint-head name=\"msapplication-config\" content=\"/mintlify-assets/_mintlify/favicons/play2sell/XDx17pbFw45Iann7/_generated/favicon/browserconfig.xml\">\u003cmeta data-mint-head name=\"apple-mobile-web-app-title\" content=\"SalesOS\">\u003cmeta data-mint-head name=\"msapplication-TileColor\" content=\"#e20c18\">\u003clink data-mint-head rel=\"canonical\" href=\"https://docs.play2sell.com/api/integrations/cvcrm\">\u003clink data-mint-head rel=\"alternate\" type=\"application/xml\" href=\"/sitemap.xml\">\u003clink data-mint-head rel=\"alternate\" type=\"text/markdown\" href=\"/api/integrations/cvcrm.md\">\u003clink data-mint-head rel=\"alternate\" hreflang=\"en\" href=\"https://docs.play2sell.com/api/integrations/cvcrm\">\u003clink data-mint-head rel=\"alternate\" hreflang=\"pt\" href=\"https://docs.play2sell.com/pt/api/integrations/cvcrm\">\u003clink data-mint-head rel=\"alternate\" hreflang=\"es\" href=\"https://docs.play2sell.com/es/api/integrations/cvcrm\">\u003clink data-mint-head rel=\"alternate\" hreflang=\"x-default\" href=\"https://docs.play2sell.com/api/integrations/cvcrm\">\u003cscript data-mint-head type=\"application/ld+json\">{\"@context\":\"https://schema.org\",\"@graph\":[{\"@type\":\"Organization\",\"@id\":\"https://docs.play2sell.com/#organization\",\"name\":\"SalesOS\",\"url\":\"https://docs.play2sell.com\",\"logo\":{\"@type\":\"ImageObject\",\"url\":\"https://mintcdn.com/play2sell/FiU6GxxU6y37uxdh/logo/light.png?fit=max\u0026auto=format\u0026n=FiU6GxxU6y37uxdh\u0026q=85\u0026s=2be3dc625b663625442ce45235218008\"}},{\"@type\":\"WebSite\",\"@id\":\"https://docs.play2sell.com#website\",\"name\":\"SalesOS\",\"url\":\"https://docs.play2sell.com\",\"publisher\":{\"@id\":\"https://docs.play2sell.com/#organization\"}},{\"@type\":\"WebPage\",\"@id\":\"https://docs.play2sell.com/api/integrations/cvcrm#webpage\",\"url\":\"https://docs.play2sell.com/api/integrations/cvcrm\",\"name\":\"CVCRM Integration — Commission Payments\",\"description\":\"How to connect your CVCRM to Play2sell PAY and pay commissions automatically — credentials, webhooks, payment method, receipt, lifecycle, testing, FAQ, and troubleshooting. Screen-by-screen setup, no coding.\",\"dateModified\":\"2026-10-05T14:00:50.818Z\",\"isPartOf\":{\"@id\":\"https://docs.play2sell.com#website\"},\"breadcrumb\":{\"@id\":\"https://docs.play2sell.com/api/integrations/cvcrm#breadcrumb\"}},{\"@type\":\"BreadcrumbList\",\"@id\":\"https://docs.play2sell.com/api/integrations/cvcrm#breadcrumb\",\"itemListElement\":[{\"@type\":\"ListItem\",\"position\":1,\"name\":\"Integrations\",\"item\":\"https://docs.play2sell.com/api/integrations/api-keys\"},{\"@type\":\"ListItem\",\"position\":2,\"name\":\"CVCRM Integration — Commission Payments\",\"item\":\"https://docs.play2sell.com/api/integrations/cvcrm\"}]},{\"@type\":[\"Article\",\"TechArticle\"],\"@id\":\"https://docs.play2sell.com/api/integrations/cvcrm#article\",\"headline\":\"CVCRM Integration — Commission Payments\",\"name\":\"CVCRM Integration — Commission Payments\",\"description\":\"How to connect your CVCRM to Play2sell PAY and pay commissions automatically — credentials, webhooks, payment method, receipt, lifecycle, testing, FAQ, and troubleshooting. Screen-by-screen setup, no coding.\",\"url\":\"https://docs.play2sell.com/api/integrations/cvcrm\",\"mainEntityOfPage\":{\"@id\":\"https://docs.play2sell.com/api/integrations/cvcrm#webpage\"},\"dateModified\":\"2026-10-05T14:00:50.818Z\",\"publisher\":{\"@id\":\"https://docs.play2sell.com/#organization\"},\"isPartOf\":{\"@id\":\"https://docs.play2sell.com#website\"}}]}\u003c/script>\u003cscript data-mint-head type=\"application/ld+json\">{\"@context\":\"https://schema.org\",\"@type\":\"WebSite\",\"name\":\"SalesOS\",\"creator\":{\"@type\":\"Organization\",\"name\":\"Mintlify\",\"url\":\"https://mintlify.com\"}}\u003c/script>","siteName":"SalesOS","nav":{"global":{"anchors":[{"anchor":"Website","icon":"globe","href":"https://play2sell.com"}]},"languages":[{"language":"en","tabs":[{"tab":"User Guide","pages":[{"title":"User Guide","href":""}]},{"tab":"Administration","pages":[{"title":"Administration","href":"/admin/initial-setup"}]},{"tab":"API \u0026 Integrations","groups":[{"group":"Overview","pages":[{"title":"Authentication","icon":"key","href":"/api/authentication"},{"title":"API Conventions","icon":"ruler","href":"/api/conventions"}]},{"group":"Integrations","pages":[{"title":"API Keys","icon":"key","href":"/api/integrations/api-keys"},{"title":"Activities Integration","icon":"plug","href":"/api/integrations/activities"},{"title":"Check-in API","icon":"location-dot","href":"/api/integrations/checkin"},{"title":"Missions API","icon":"bullseye-arrow","href":"/api/integrations/missions"},{"title":"Campaigns API","icon":"gift","href":"/api/integrations/campaigns"},{"title":"SSO (Single Sign-On)","icon":"key","href":"/api/integrations/sso"},{"title":"Player Progress API","icon":"trophy","href":"/api/integrations/progress"},{"title":"Earnings API","icon":"wallet","href":"/api/integrations/earnings"},{"title":"Payments Integration","icon":"credit-card","href":"/api/integrations/payments"},{"title":"Webhooks (Outbound)","description":"Receive real-time events from SalesOS at your own HTTPS endpoint — envelope, signature verification, event catalog, retries and idempotency.","icon":"webhook","href":"/api/integrations/webhooks"},{"title":"CVCRM Integration — Commission Payments","icon":"building","href":"/api/integrations/cvcrm"},{"title":"SIGAVI 360 Integration — Missions, Leads, and Commission Payments","description":"How to connect your SIGAVI 360 to Play2sell so that brokers' activities count toward missions, service records become leads, and each proposal's commissions are charged and transferred through Commission Payments — integration user, funnel stages, what is read, commission payment rules, FAQ, and troubleshooting.","icon":"building","href":"/api/integrations/sigavi"}]}]},{"tab":"FAQ \u0026 Support","pages":[{"title":"FAQ \u0026 Support","href":"/support/faq/general"}]}]},{"language":"pt","pages":[{"title":"pt","href":"/pt/api/integrations/cvcrm"}]},{"language":"es","pages":[{"title":"es","href":"/es/api/integrations/cvcrm"}]}]},"title":"CVCRM Integration — Commission Payments - SalesOS","buildId":"dpl_5UGCeHaPhSKbAExsKaHeR8dW3HyG","deploymentId":"dpl_5UGCeHaPhSKbAExsKaHeR8dW3HyG","dynamics":["07c022d89b","a74be98ba7"],"chunks":["Frame-DYrD4gCJ.js","DynamicMarkdown-BTVnG8lc.js","zoom-image-lightbox-DgtuyVql.js","PlusIcon-BCNs_Q8j.js","lightbox-handle-r17bVUz3.js"]}